Doctor Dashboard FAQ
1.0: Teleconsultation
Q) 1.1 My video and microphone are not working?
Before the provider is connected with the user, they will be able to test their microphone, speaker and camera while waiting for the user to enter the call. Please ensure that you have allowed access to your camera and microphone.
Refer to Fig 1.0 for user flow reference.
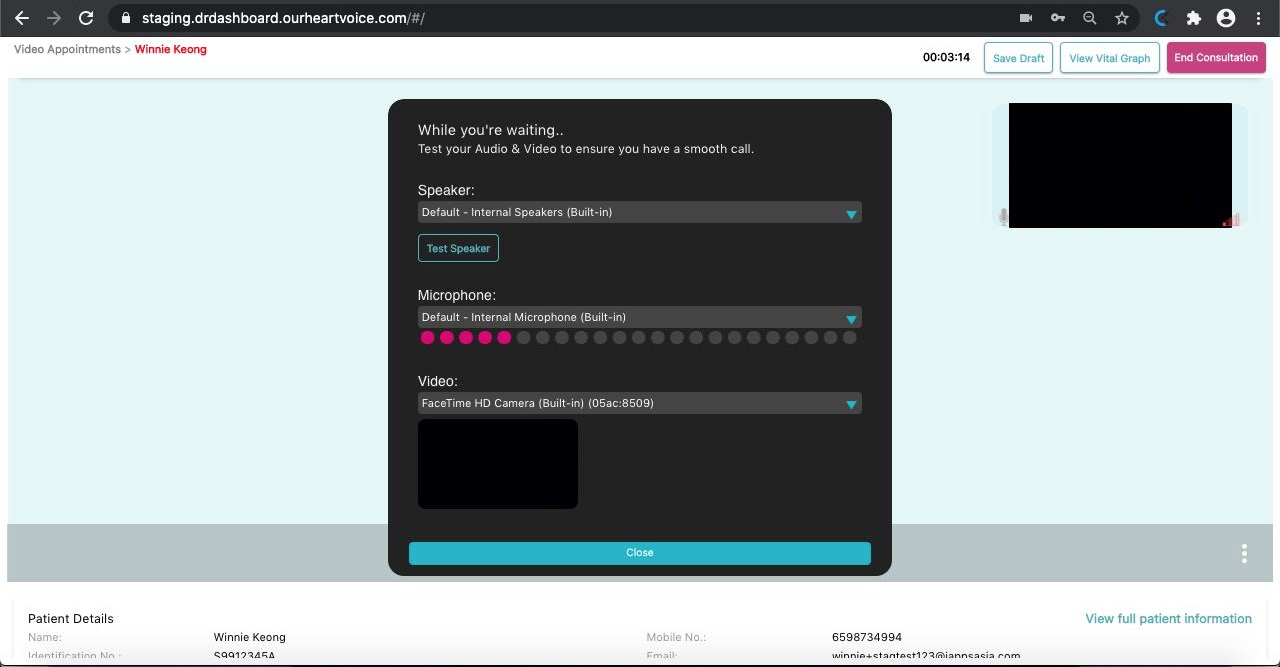
Fig 1.0 – this is what providers will see if they do not allow access to microphone and camera
You can also access this during the video call by clicking on the three dots icon located at the bottom right hand corner of the screen. Labelled as “Settings”
Q) 1.2 How can I share a screen during teleconsultation?
Yes you will be able to share your screen by clicking on the 3 dots icon located at the bottom left corner. Click on “share screen” > select the screen you would like to share.
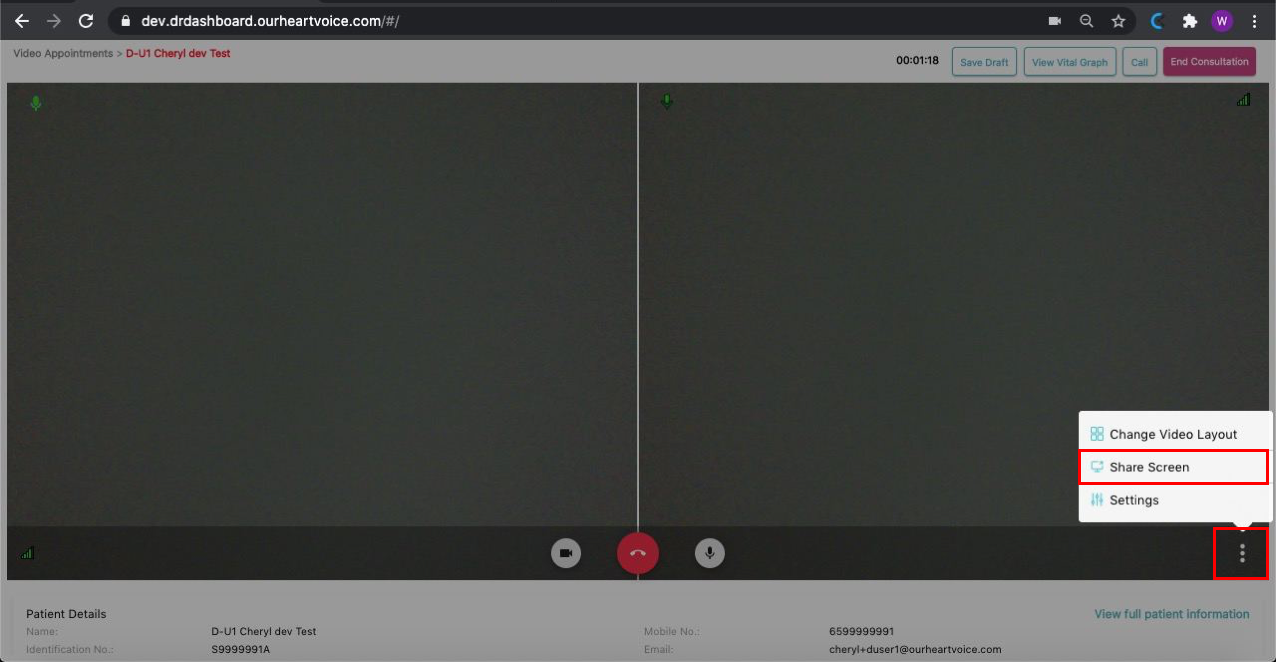
Fig 1.1 – Share screen option located under the 3 dots icon
Q) 1.3 How do I change my video layout?
Click on the settings icon > selecting on the “change video layout” button.
Fig 1.2 – Change screen layout option located under the 3 dots icon
Q) 1.4 How will users initiate a consultation with me?
Users can find provider in
- Our Website https://web.ourheartvoice.com/#/telemedicine
- Whatsapp – if users have the provider’s QR code or start word eg. hellodrchan.
- HeartVoice APP > See a doctor
If you are online, users can initiate a consultation with you immediately.
If you are offline, users can book an appointment with you.
You will receive an email notification and see the appointment in VIDEO CALL > UPCOMING. You can choose to confirm, cancel or reschedule the appointment.
Q) 1.5 What is the difference between Upcoming, today and history?
Upcoming:
Display appointments booked for the day.
Today:
Display all appointments that have been completed or cancelled today. (this list will be auto transcript into the history tab at the end of the day)
History:
Display providers all completed and cancelled appointments.
Consultation Summary 1.9
Q) 1.9.1 How can I give out MC?
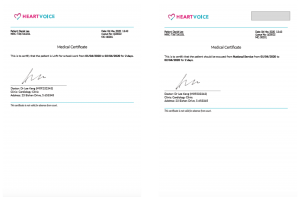
After the video consultation > go to consultation summary > scroll to the “Medical Certificate” section. Providers can set up the MCs for users there. Simply enter the no. of days, select the correct date, select from the 2 default MC template.
The MC will be given to the user after he/she has completed payment. They can view it in the HeartVoice Mobile APP (Coming soon) or in our whatsapp bot.
MC is password protected with the last 4 characters of user’s identification no.
Refer to Fig 2.0 for MC template:
Q) 1.9.2 Can I give out multiple MCs?
Yes you will be able to add multiple MC. Scroll to the “Medical Certificate” section, click on the “+add MC” button and enter in the MC details. Refer to Fig 2.1 for reference.
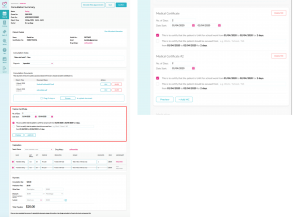
Fig 2.1 – adding additional MC flow
Q) 1.9.3 i want to continue to use my own Clinic's MC
You will still be able to upload your own MCs by placing it in the “consultation documents” section.
Q) 1.9.4 Where are the preset diagnoses from?
The dropdown diagnosis list comes from the dropdown diagnosis list is taken from the International Classification of Disease – 10 by the World Health Organisation. (ICD-10)
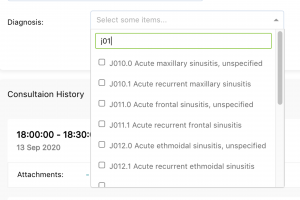 Fig 4.0 – preset diagnosis dropdown example
Q) 1.9.5 Will I be able to charge users for other services?
Yes you will be able to charge other services fee to users. Scroll to the bottom of the consultation summary:
Under the payment section > other fees > enter description and fee.
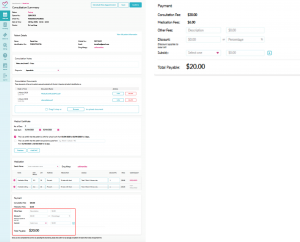
Fig 5.0 – Other fees example
Q) 1.9.6 Can I give my users discounts if I want to?
Yes you will be able to give discounts if you would like to.
Under Consultation summary:
Under the payment section > discounts > enter description and fee.
NOTE: IF THE TOTAL PAYABLE AFTER DISCOUNT is 0 , the provider will not be able to apply a subsidy amount to the bill.
Fig 6.0 – giving discount example
Q) 1.9.7 How do I apply subsidies for users when they make payment?
You will be able to apply subsidies for your users when you are entering the payments details under the “Payment” section.
Under the payment section > Subsidies > select type of subsidies and discount amount > click save.
Please note that, if subsidies or discounts are given, users WILL NOT be able to reject any medication. Should the user reject your medication, you will be able to take away the medication by going back to the user’s consultation summary.
Fig 7.0 – giving subsidies example
Q) 1.9.8 Are Users allowed to remove medication?
Users will be able to remove any of their medication when at the checkout page. Whenever a user removes a medication, it will be reflected in the consultation summary.
*Please note that, if subsidies or discounts are given, users WILL NOT be able to reject any medication. Should your user reject your medication, you will be able to take away the medication by going back to the user’s consultation summary.
Q) 1.9.9 Will I be able to see the user's payment status?
Yes, you will be able to see the user’s consultation summary under the “history” or “today”s tab in your video call page.
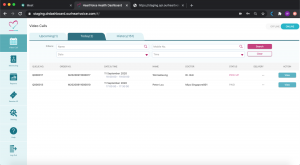
Fig 8.0 user’s payment status
2.0: Monitoring Program tab
Q) 2.1 How can a user join a provider’s monitoring program?
Step 1: In mobile APP home page > select [Join Program]
Step 2: User can select a program and request to join.
You will receive an email to approve / decline the user’s request. If approved, users will receive an email with unique code to join the program. Once a user enters the code and successfully joins the program, they will be shown in the monitoring list.
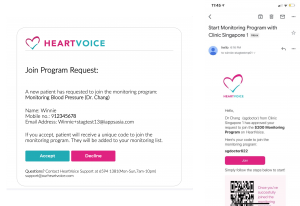
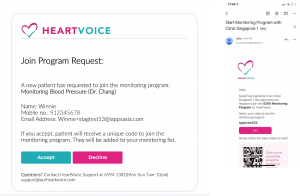
Fig 9.0 user request to joining monitoring program email
Q) 2.2 How do I add users to my monitoring program?
In monitoring list:
- Tap [Register new patient] located at the top right hand corner of the screen > Register new user page
- Fill in user’s details accordingly (note that all fields are compulsory)
- Select monitoring program in dropdown box
- Click on confirm!
Users will receive an email with unique code to join the program.
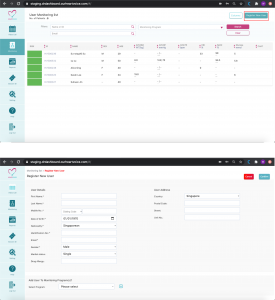
Fig 9.1 adding new user to monitoring program.
2.3 Set goal
Q) 2.3.1 How do I set a goal for my monitoring users?
You will be able to set goals for all vitals, to set up goal follow the steps below:
- Go to the monitoring tab
- Select the user in list
- Click on “Set Goal” button
- Fill in necessary details
- Click on save
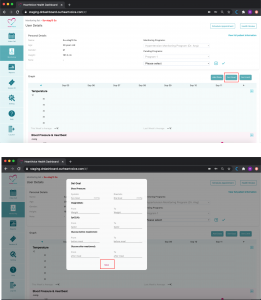
Fig 10.0 setting goal for monitoring user
2.4 Set Limit
Q) 2.4.1 How do I set a limit for my monitoring users?
You will be able to set limits for upper & lower limits for blood pressure & weight. After setting up limits, if average data exceeds limit, it will show as high risk.
To set up goal follow the steps below:
- Go to monitoring tab
- Select the user you would like to set limit to by clicking the the user’s bar
- Click on “Add limit”
- Fill in details
- Click on save
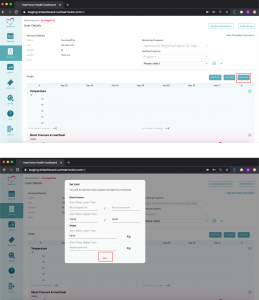
Fig 10.1 setting limit for monitoring user
Q) 2.4.2 What is the difference between goal and limit?
The difference between “limit” and “goal” is, by setting a limit when the user’s vital data ever hits below or above the set limit, a notification will prompt you, telling you that the user’s vital data is abnormal. Setting a goal is a target for the user to work towards.
2.5: Add Data
Q) 2.5.1 Can I manually add data for users if they come to my clinic?
Yes, a user is registered as a monitoring user you can manually key in their data from the monitoring tabs.
To do so follow the steps below:
- Go to monitoring tab
- Select the user you would like to set limit to by clicking the the user’s bar
- Click on “Add Date”
- Fill in readings
- Click save
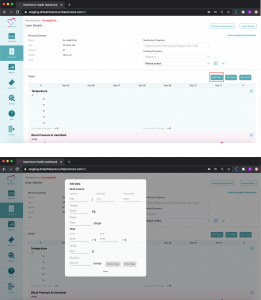
Fig 10.2 Manually adding data for monitoring user
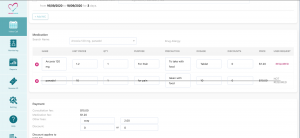
2.6: View Vital History
Q) 2.6.1 How do I view my monitoring user’s vital history?
The history icon is located at every data section as shown below.
- Select the user you would like to view their vitals history to by clicking the the user’s bar
- Scroll and find which data you would like to see
- Click on the”Menu” icon.
- Shows vitals history
History icon: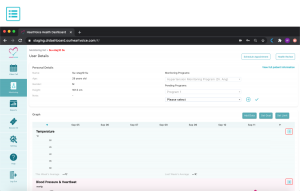
Fig 10.3 user’s vital history
Q) 2.6.2 How do I schedule an appointment with a user?
You can schedule an appointment with your monitoring users or users you have consulted before on the dr dashboard.
Existing users:
- Go to history tab
- Find the user you wish to schedule an appointment with
- Click on the “view” located in the left column of the table labeled as “action”
- Click on the “schedule next appointment”
- Select date and time
- Scroll down and click on “confirm”
- The user will receive a notification, prompting user to either “confirm” or “reschedule” the appointment
Monitoring users:
- Go to monitoring tab
- Find the user you wish to schedule an appointment with and click on it
- Click on the “schedule next appointment”
- Select date and time
- Scroll down and click on “confirm”
- The user will receive a notification, prompting user to either “confirm” or “reschedule” the appointment
Q) 2.6.3 How do providers check their user’s health notifications?
Go to the monitoring tab
- Select the user you would like to chat with by clicking the the user’s bar
- Click on the “Health Review” button located at the top right hand corner
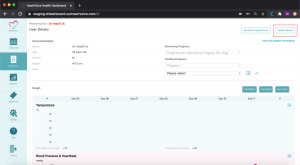
Fig 11.0 view user’s health notifications button
3.0 Dashboard: Report
Q) 3.1 What is the Report tab?
In the Report page, is where all the clinic statistics will be located at.
There are 3 different tabs:
- Daily settlement report (Can be filtered: orders, providers)
- Daily Subsidies Report (Total amount of subsidies)
- Daily Dispensary Report (Total amount of medication dispensed)
Here is where you will be able to export all your clinic reports.
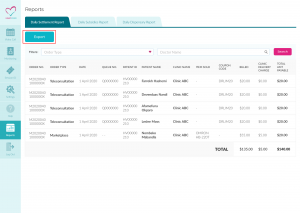
Fig 12.0 export daily settlement report
4.0 Settings
4.1 General Settings:
Q) 4.1.1 What is General Settings?
In dashboard settings providers will be able to edit their own auto logout duration. This auto logout function applies to all accounts under this clinic. Providers are able to choose their duration options in the dropdown menu.
Q) 4.1.2 How long can I leave my Dr Dashboard on before it auto logs out?
Timer will reset once a meaningful action is performed on the browser. Providers are able to choose their duration options in the dropdown menu:
Dropdown options:
- 15 minutes
- 30 minutes
- 1 hour
- 2 hours
- 4 hours
- 6 hours
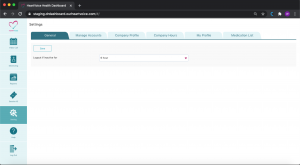
Fig 13.0 general settings
4.2: Manage Account Tab
Q) 4.2.1 How do I add new roles?
- Go to “Manage accounts” tab and click on “Add Roles” button
- Enter role name
- Select the limitations you wish to allow to this role
- Click on “Confirm”

Fig 14.0 Add new role flow
Q) 4.1.2 How long can I leave my Dr Dashboard on before it auto logs out?
Please create a role before creating a staff account.
Step 1: Click on “Add Staff” button
Step 2: Click on drop down menu and select the roles that you have previously created
Step 3: Enter Name
Step 4: Enter email address
Step 5: Click on “Confirm” Button to create the account.
The staff email will receive an invitation to the dashboard to set the password for that account.
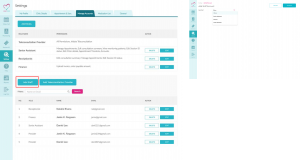 Fig 14.1 Add new staff account flow
Q) 4.2.3 How to Add a Teleconsultation Provider Account?
Only teleconsultation provider accounts can conduct teleconsultations.
The super admin can add another teleconsultation provider account in SETTING > MANAGE ACCOUNTS > ADD TELECONSULTATION PROVIDER.
Step 1: Fill in the necessary fields
Step 2: Tap [Proceed to pay] to make payment (if any) and create the accounts.
Fig 14.2 Add new teleconsultation provider flow
Q) 4.2.3 How to Add a TeleQ) 4.2.4 How to delete roles?consultation Provider Account?
Please note that you will not be allowed to delete a role that has an account assigned to it. If you wish to do so you will have to change the account role first. account and deleting a role is different.
Fig 14.3 delete role pop up message
4.3: Company Details Tab
Q) 4.3.1 Where can i set up my company’s Details?
Step 1: Go to Settings
Step 2: Under Settings go to “Company profile” page
If your clinic is providing your own medication delivery service, please fill in
- Estimated medication delivery time in hours e.g 4
- Medication Delivery price ($) e.g. 20
Step 3: Once you complete, click the [SAVE] button at the top to save your clinic details.
Fig 15.0 setting up company’s details
Q) 4.3.2 How do I edit/update my clinic details?
Go to the “Company profile” tab located under settings. And click on edit, once you have completed your changes click on “confirm”. A pop up message will appear confirming your changes.
4.4: Company hours
Q) 4.4.1 What is the company hours tab?
Providers will be able to set up their Clinic opening hours for telemedicine & medication pick up. Please note that Each shift should end at least 1 hour before the clinic closes. This is also the last order time for medication.
Company hours tab input fields:
- Day (s) (Which days clinic is open for teleconsultation)
- Start (what time telemedicine begins)
- End (what time telemedicine ends)
- Add shift button
Fig 16.0 company hours
Q) 4.4.2 How to set up Clinic opening hours for telemedicine & medication pick up?
- Click on days, select amount of days that clinic is open for telemedicine
- Enter Opening timing in “Start” field
- Enter Closing timing in “End” field
- Click on “Add Shift”
To remove shifts click on the “x” button.
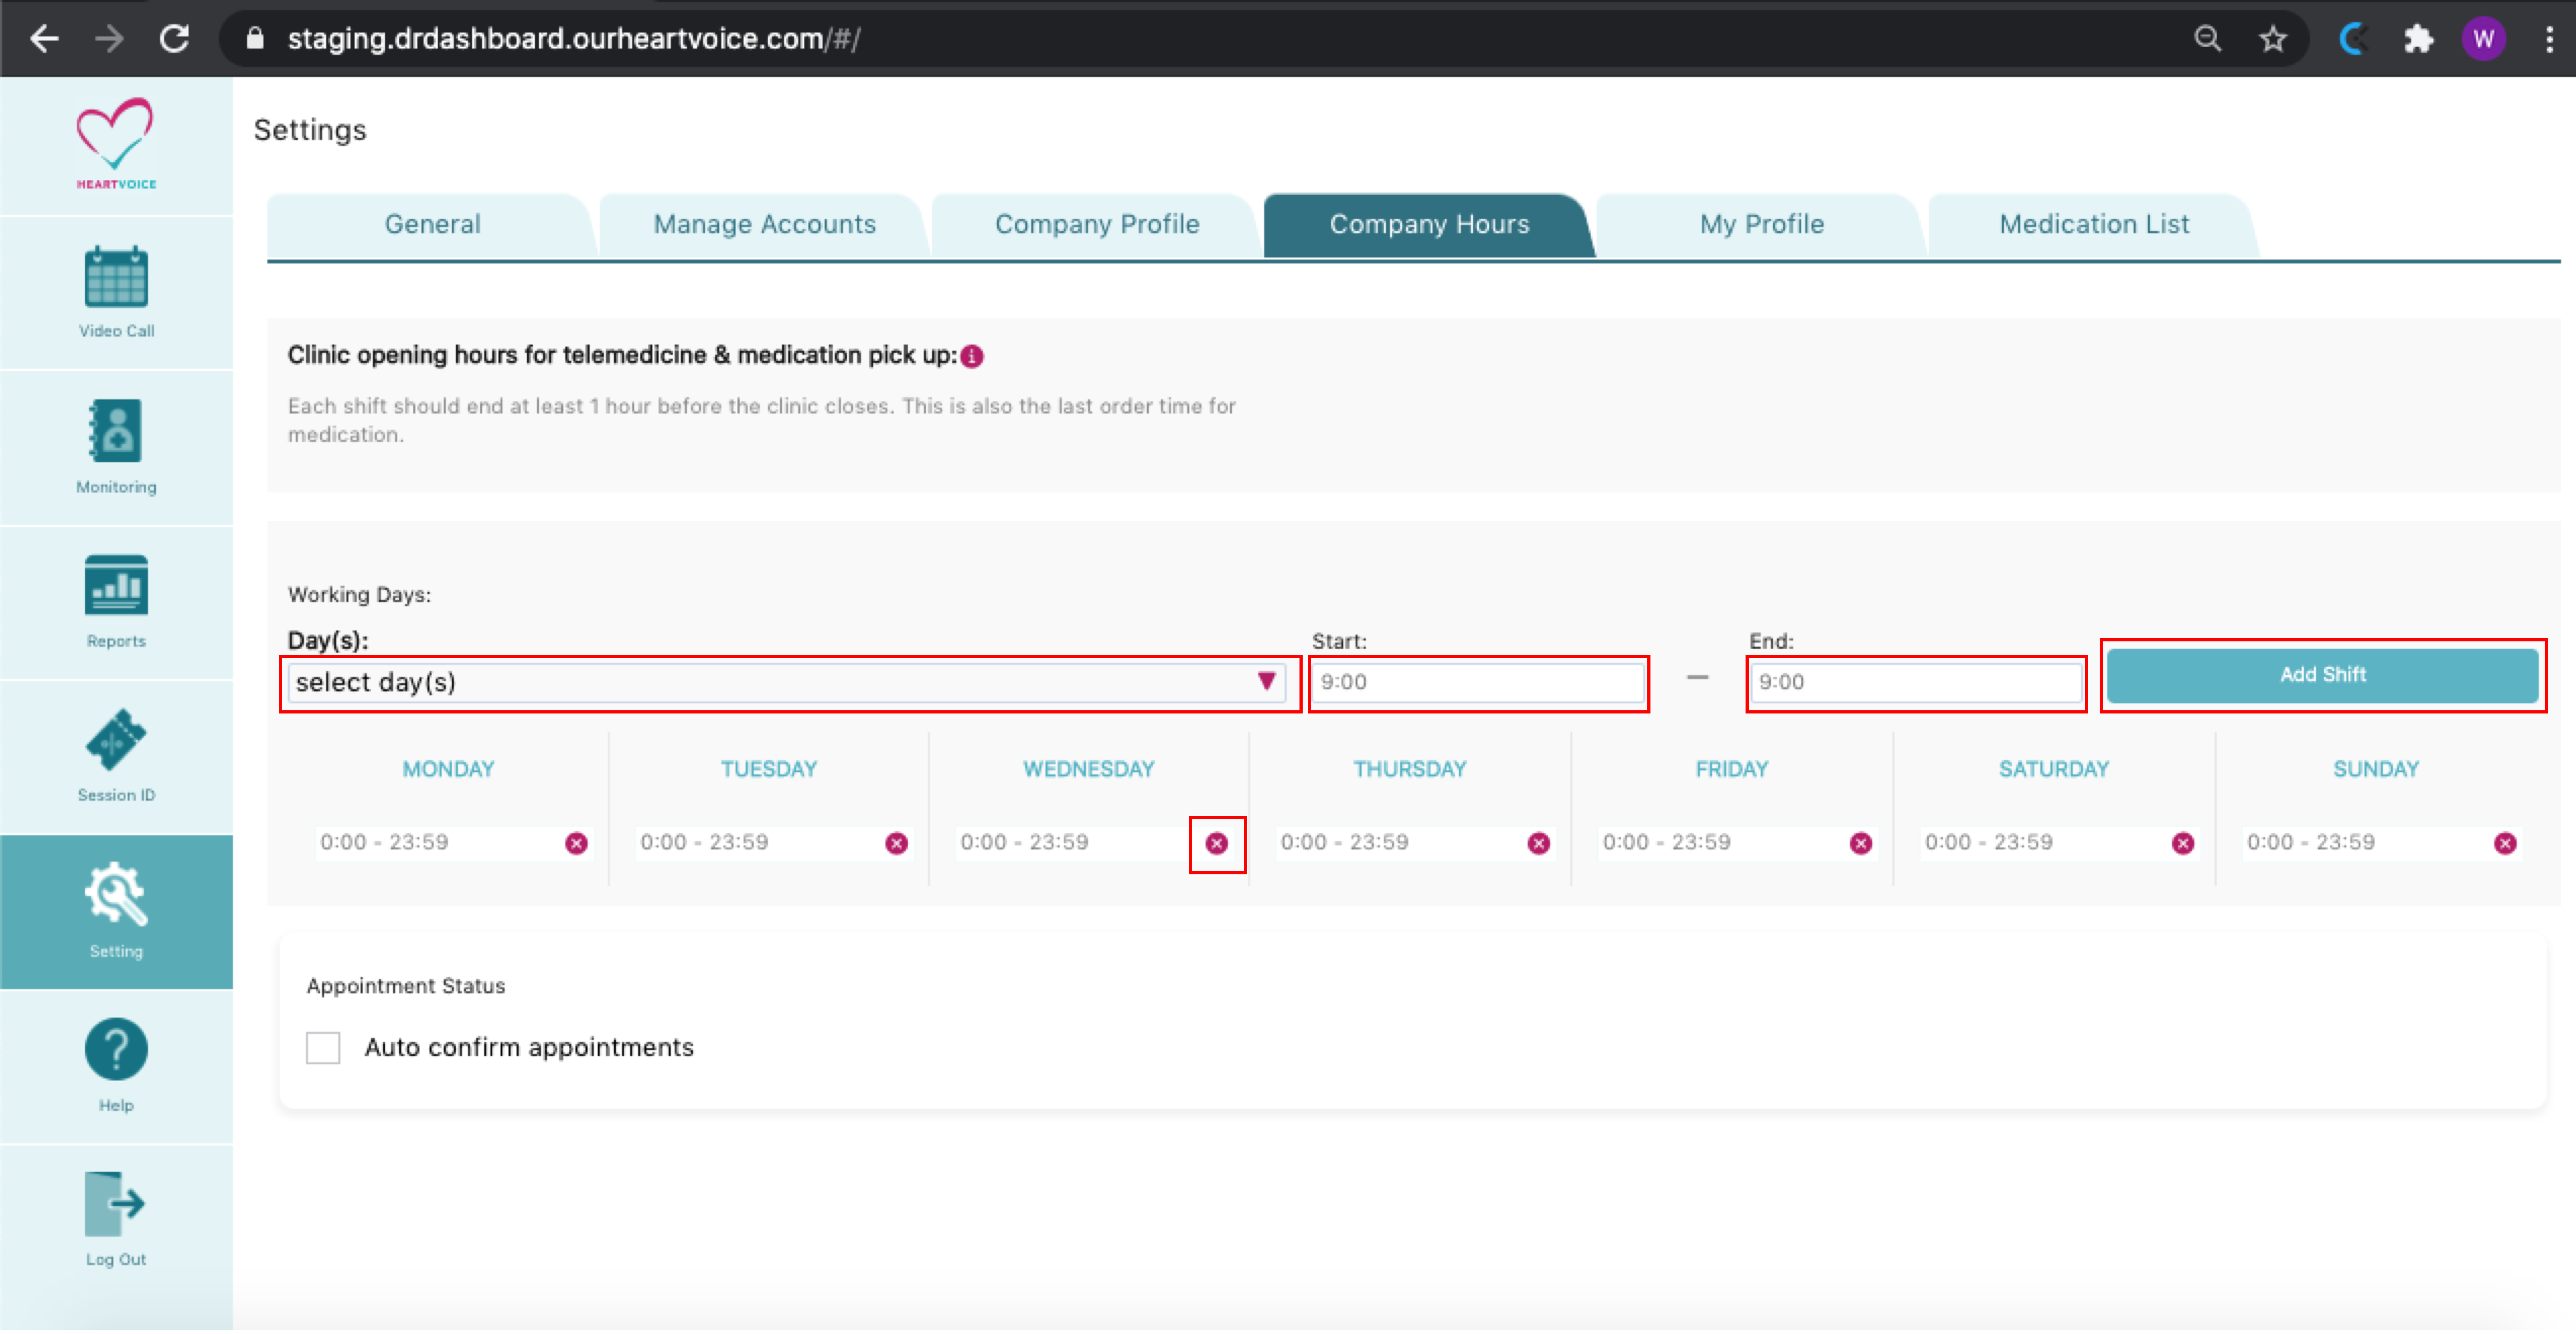
Fig 16.1 setting up company hours
4.6: My Profile
Q) 4.6.1 Where do i set up my profile?
“My Profile” Tab is where providers will be able to set up their own profile. Over here providers will be required to fill in their profile information
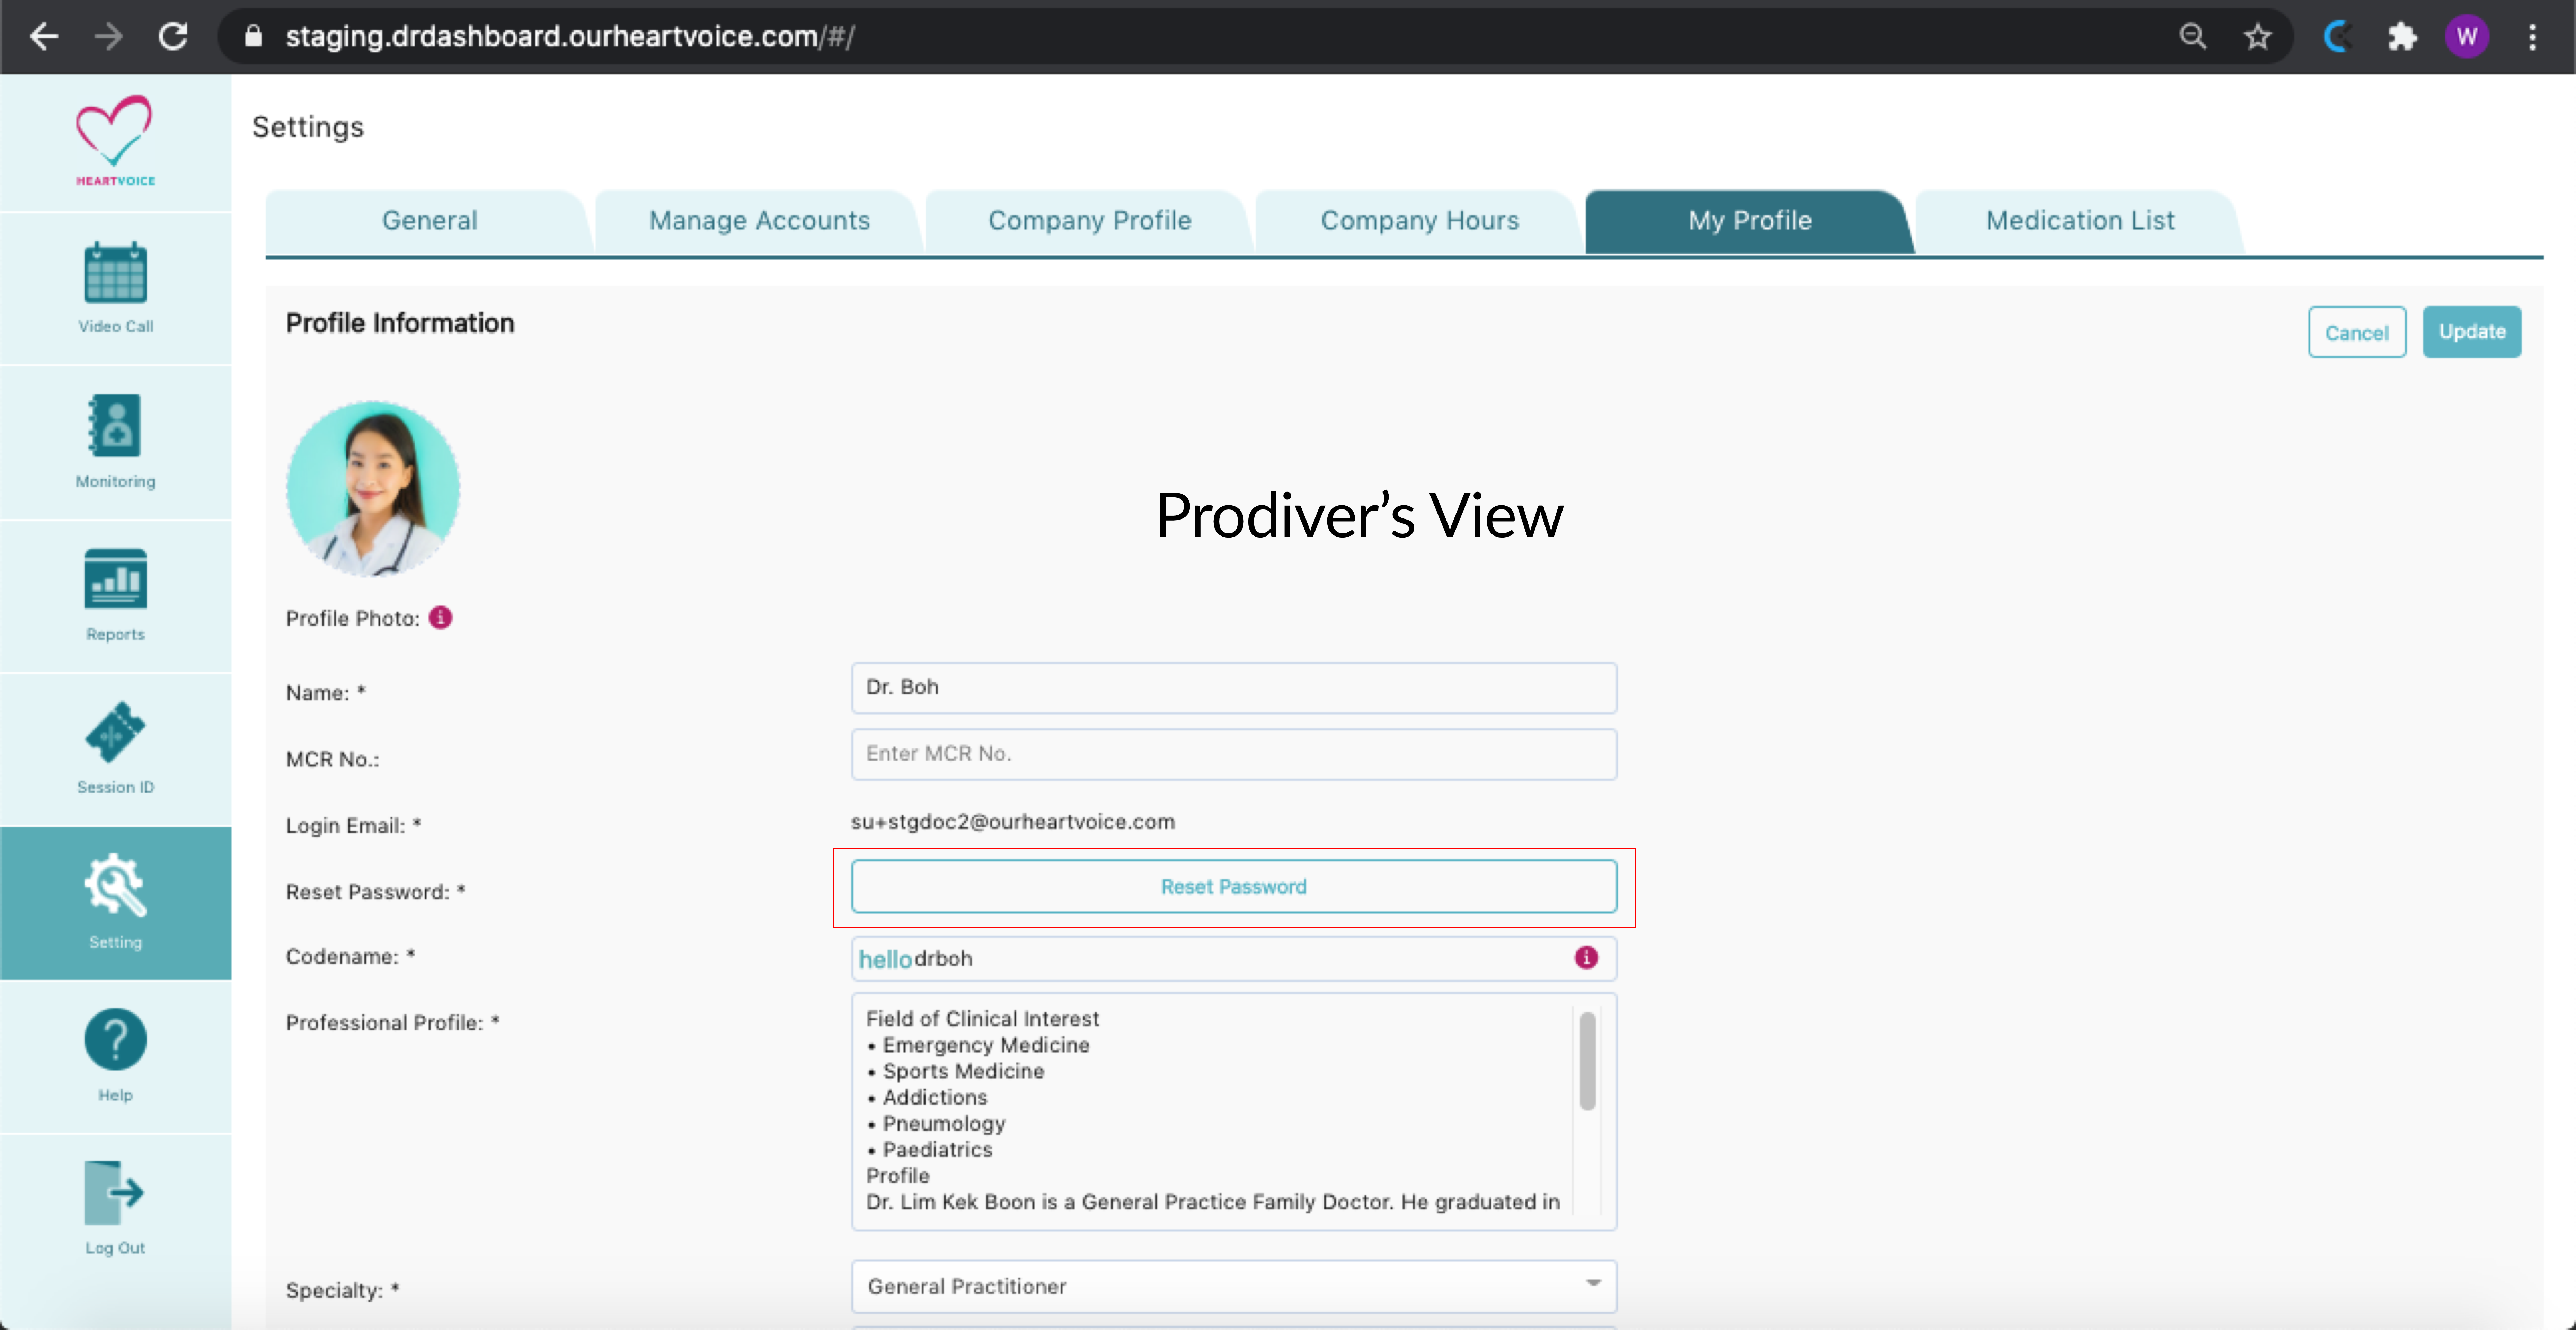
Fig 17.0 setting up provider’s profile
You will also find the “share your contact with patients” section at the bottom of the page. Under this section you will be able to:
- See your webpage URL
- Decide whether you want your clinic to be featured on our clinic webpage
- Download your Virtual card
- See your coupon code (which will defaultly be the same as your Code name (Whatsapp Startword)
*Please note that if the compulsory fields are not filled an error message will be shown below the field.
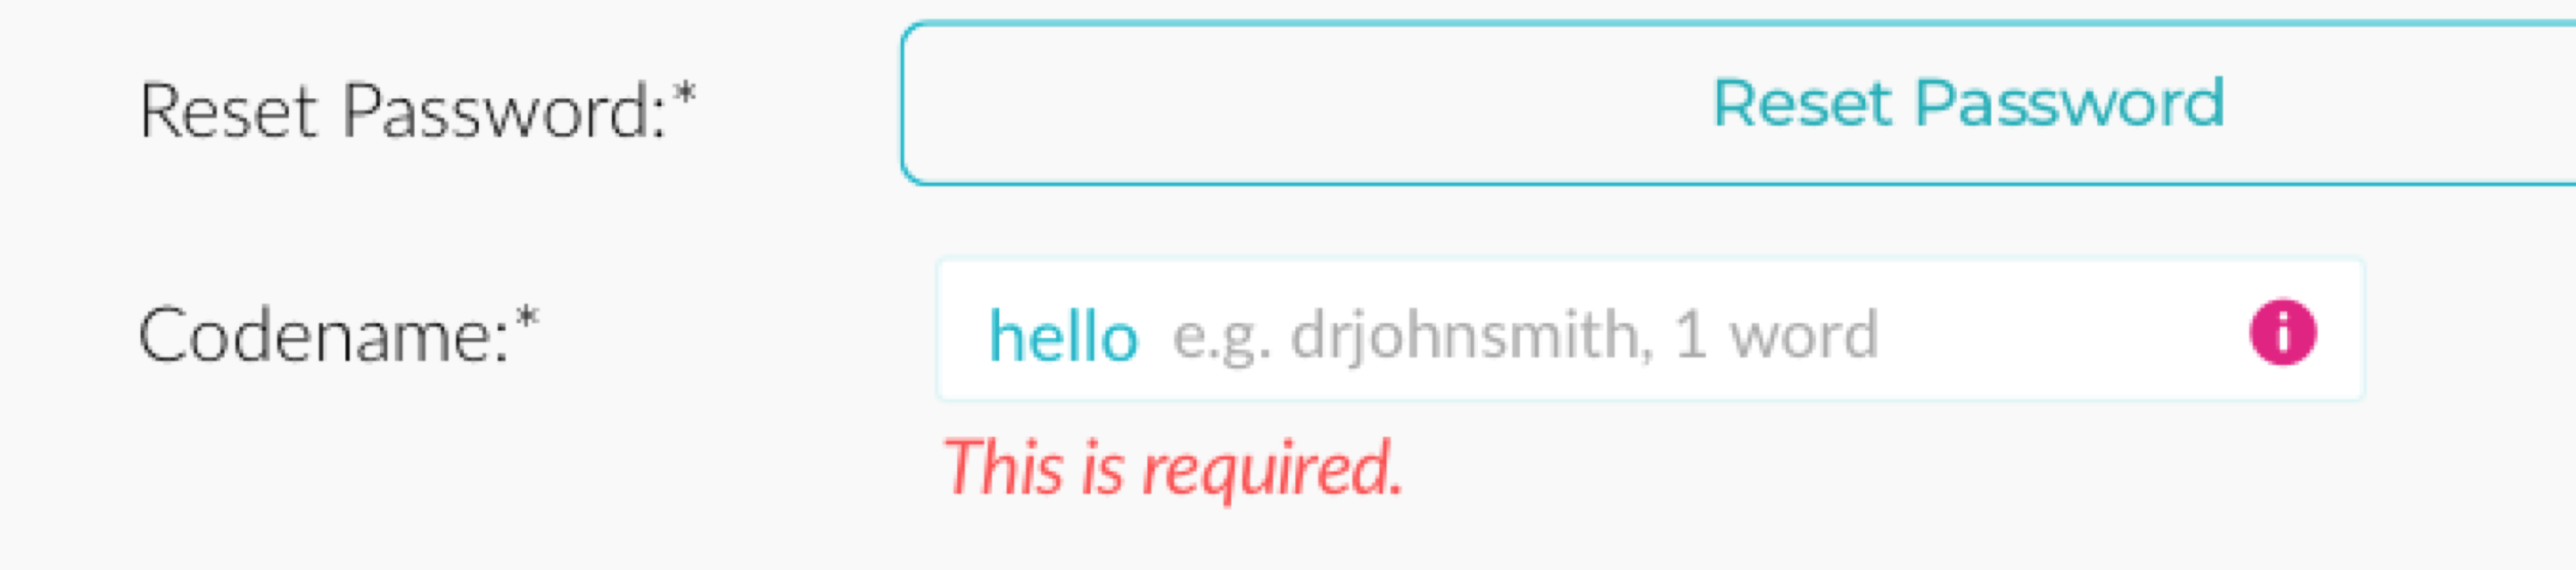
Fig 17.1 setting up provider’s profile – error message
For Staff, after setting up your staff profile, your staff’s “My Profile” Tab under settings in HeartVoice Dashboard will show:
- Staff display name (Editable)
- Staff role (Uneditable)
- Staff Login email (Uneditable)
- Reset password button
Make sure after making amendments to your profile, click on the button “Update” to save your changes.
4.7: Medication List
Q) 4.7.1 How can I prescribe medications to users?
To prescribe medication, please set up your frequently used / full medication list in Settings > Medication List. For details on how to set up medications, please refer to FAQ on “How to set up medications”
Q) 4.7.2 I do not want to set up my medication list.
If you do not wish to set up all the medication, you should select the default medication called “All Medications” and enter the total cost of all medications for each consultation. This is recommended to give users a breakdown of the medication fee.

Fig 3.0 – Adding medication field called: All medications
You can prescribe medication during and after video consultation.
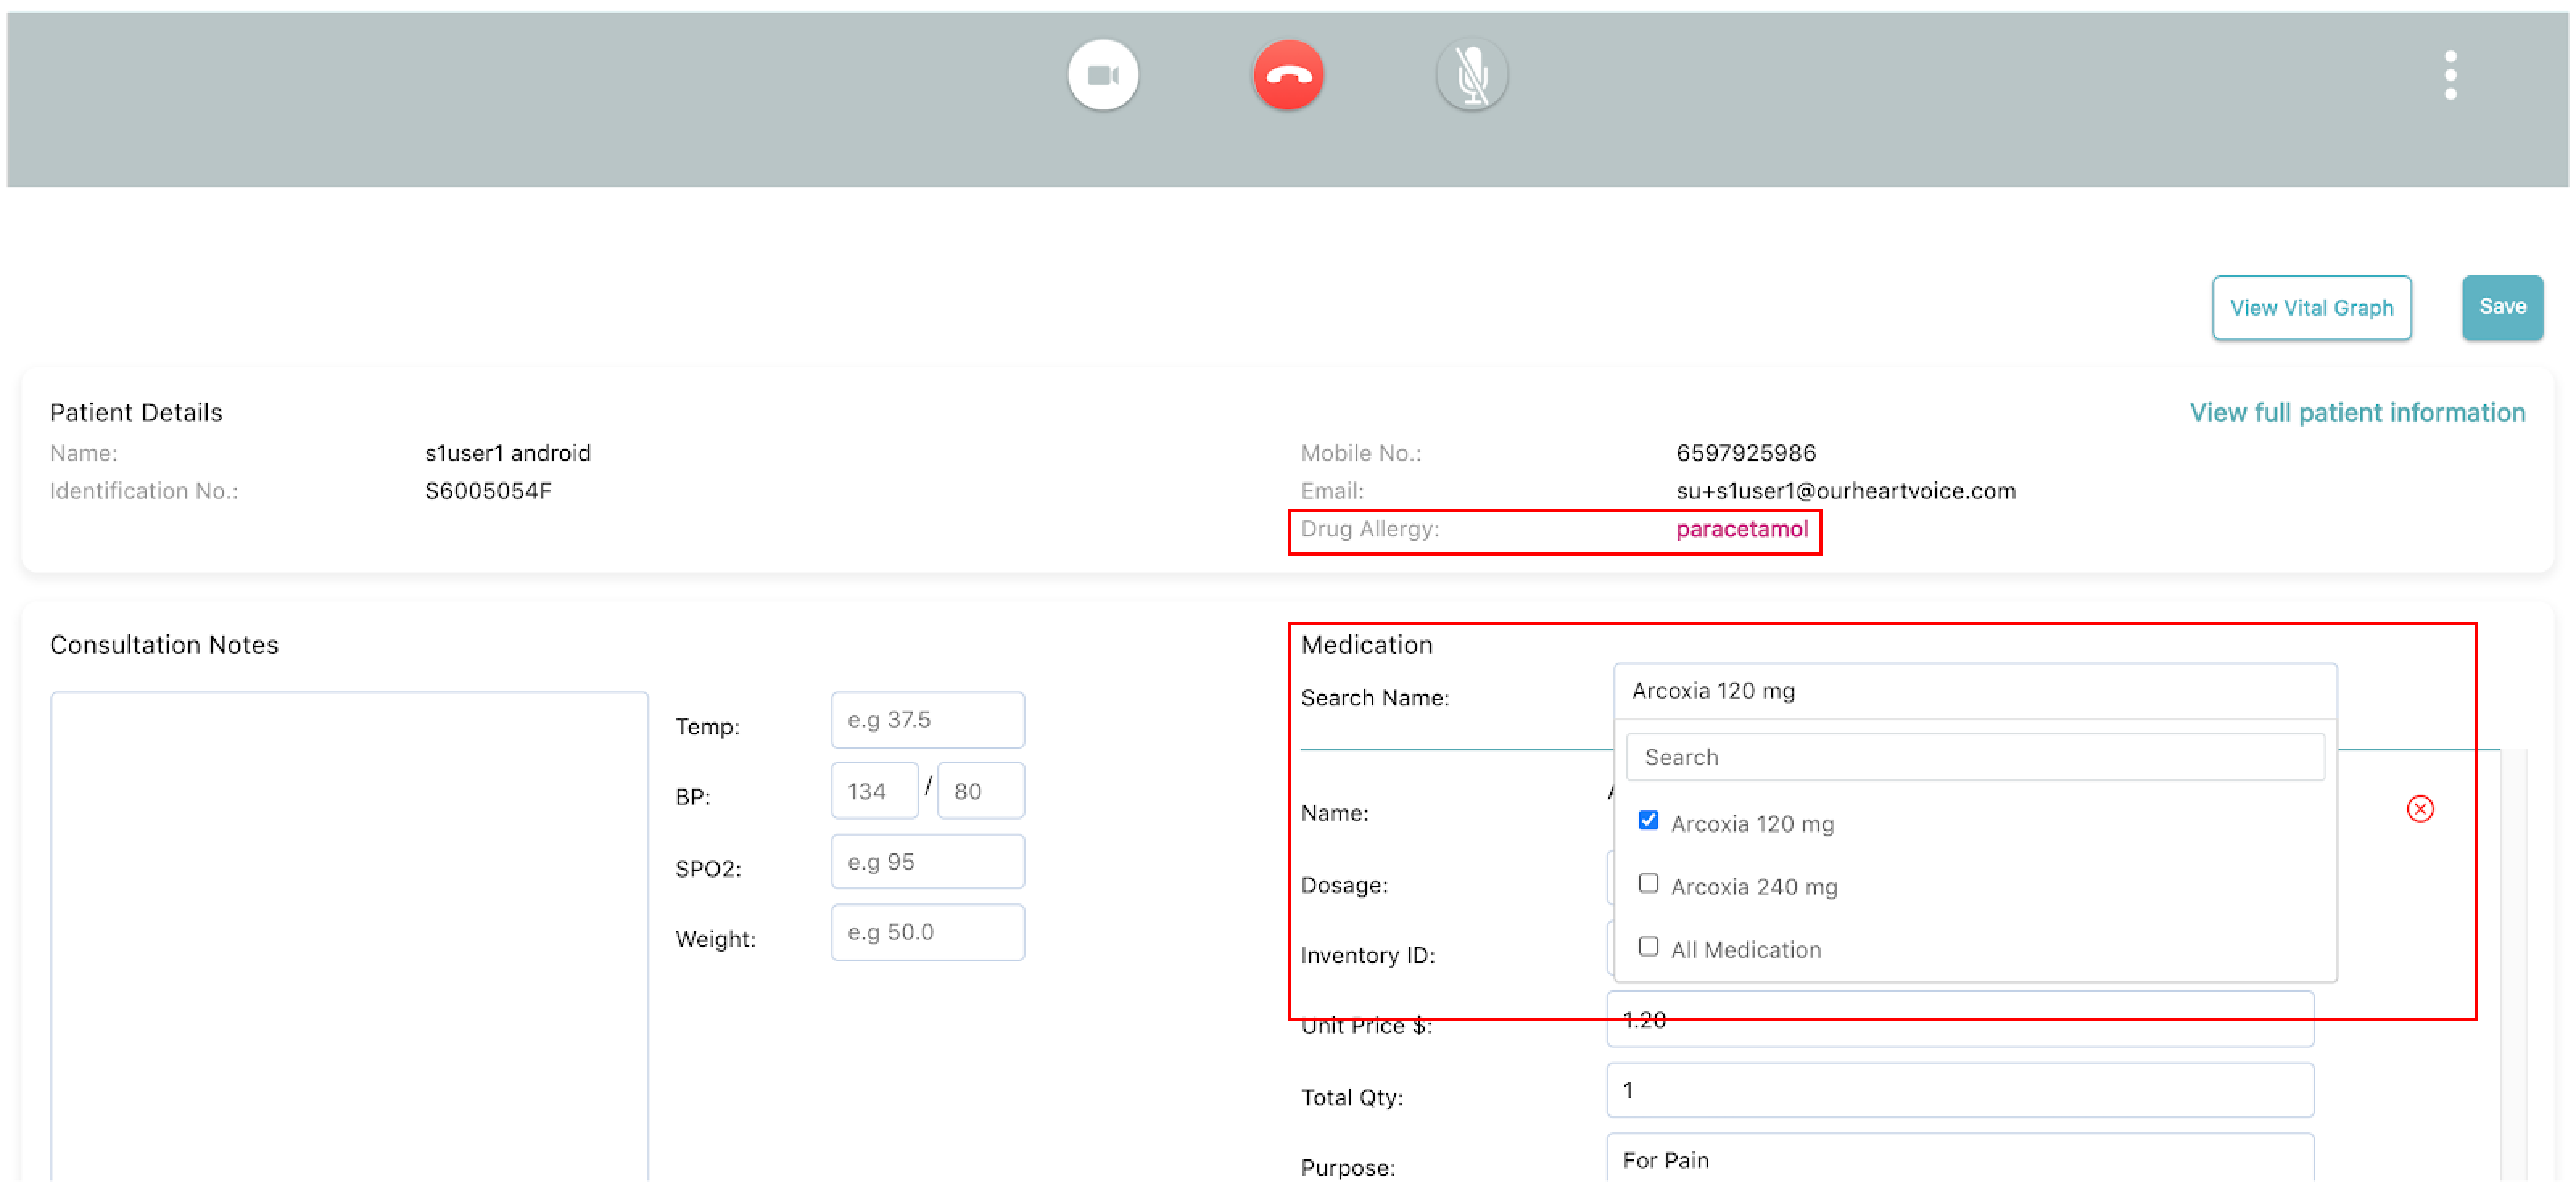
Fig 3.1 – All medications option found in teleconsultation, medication section
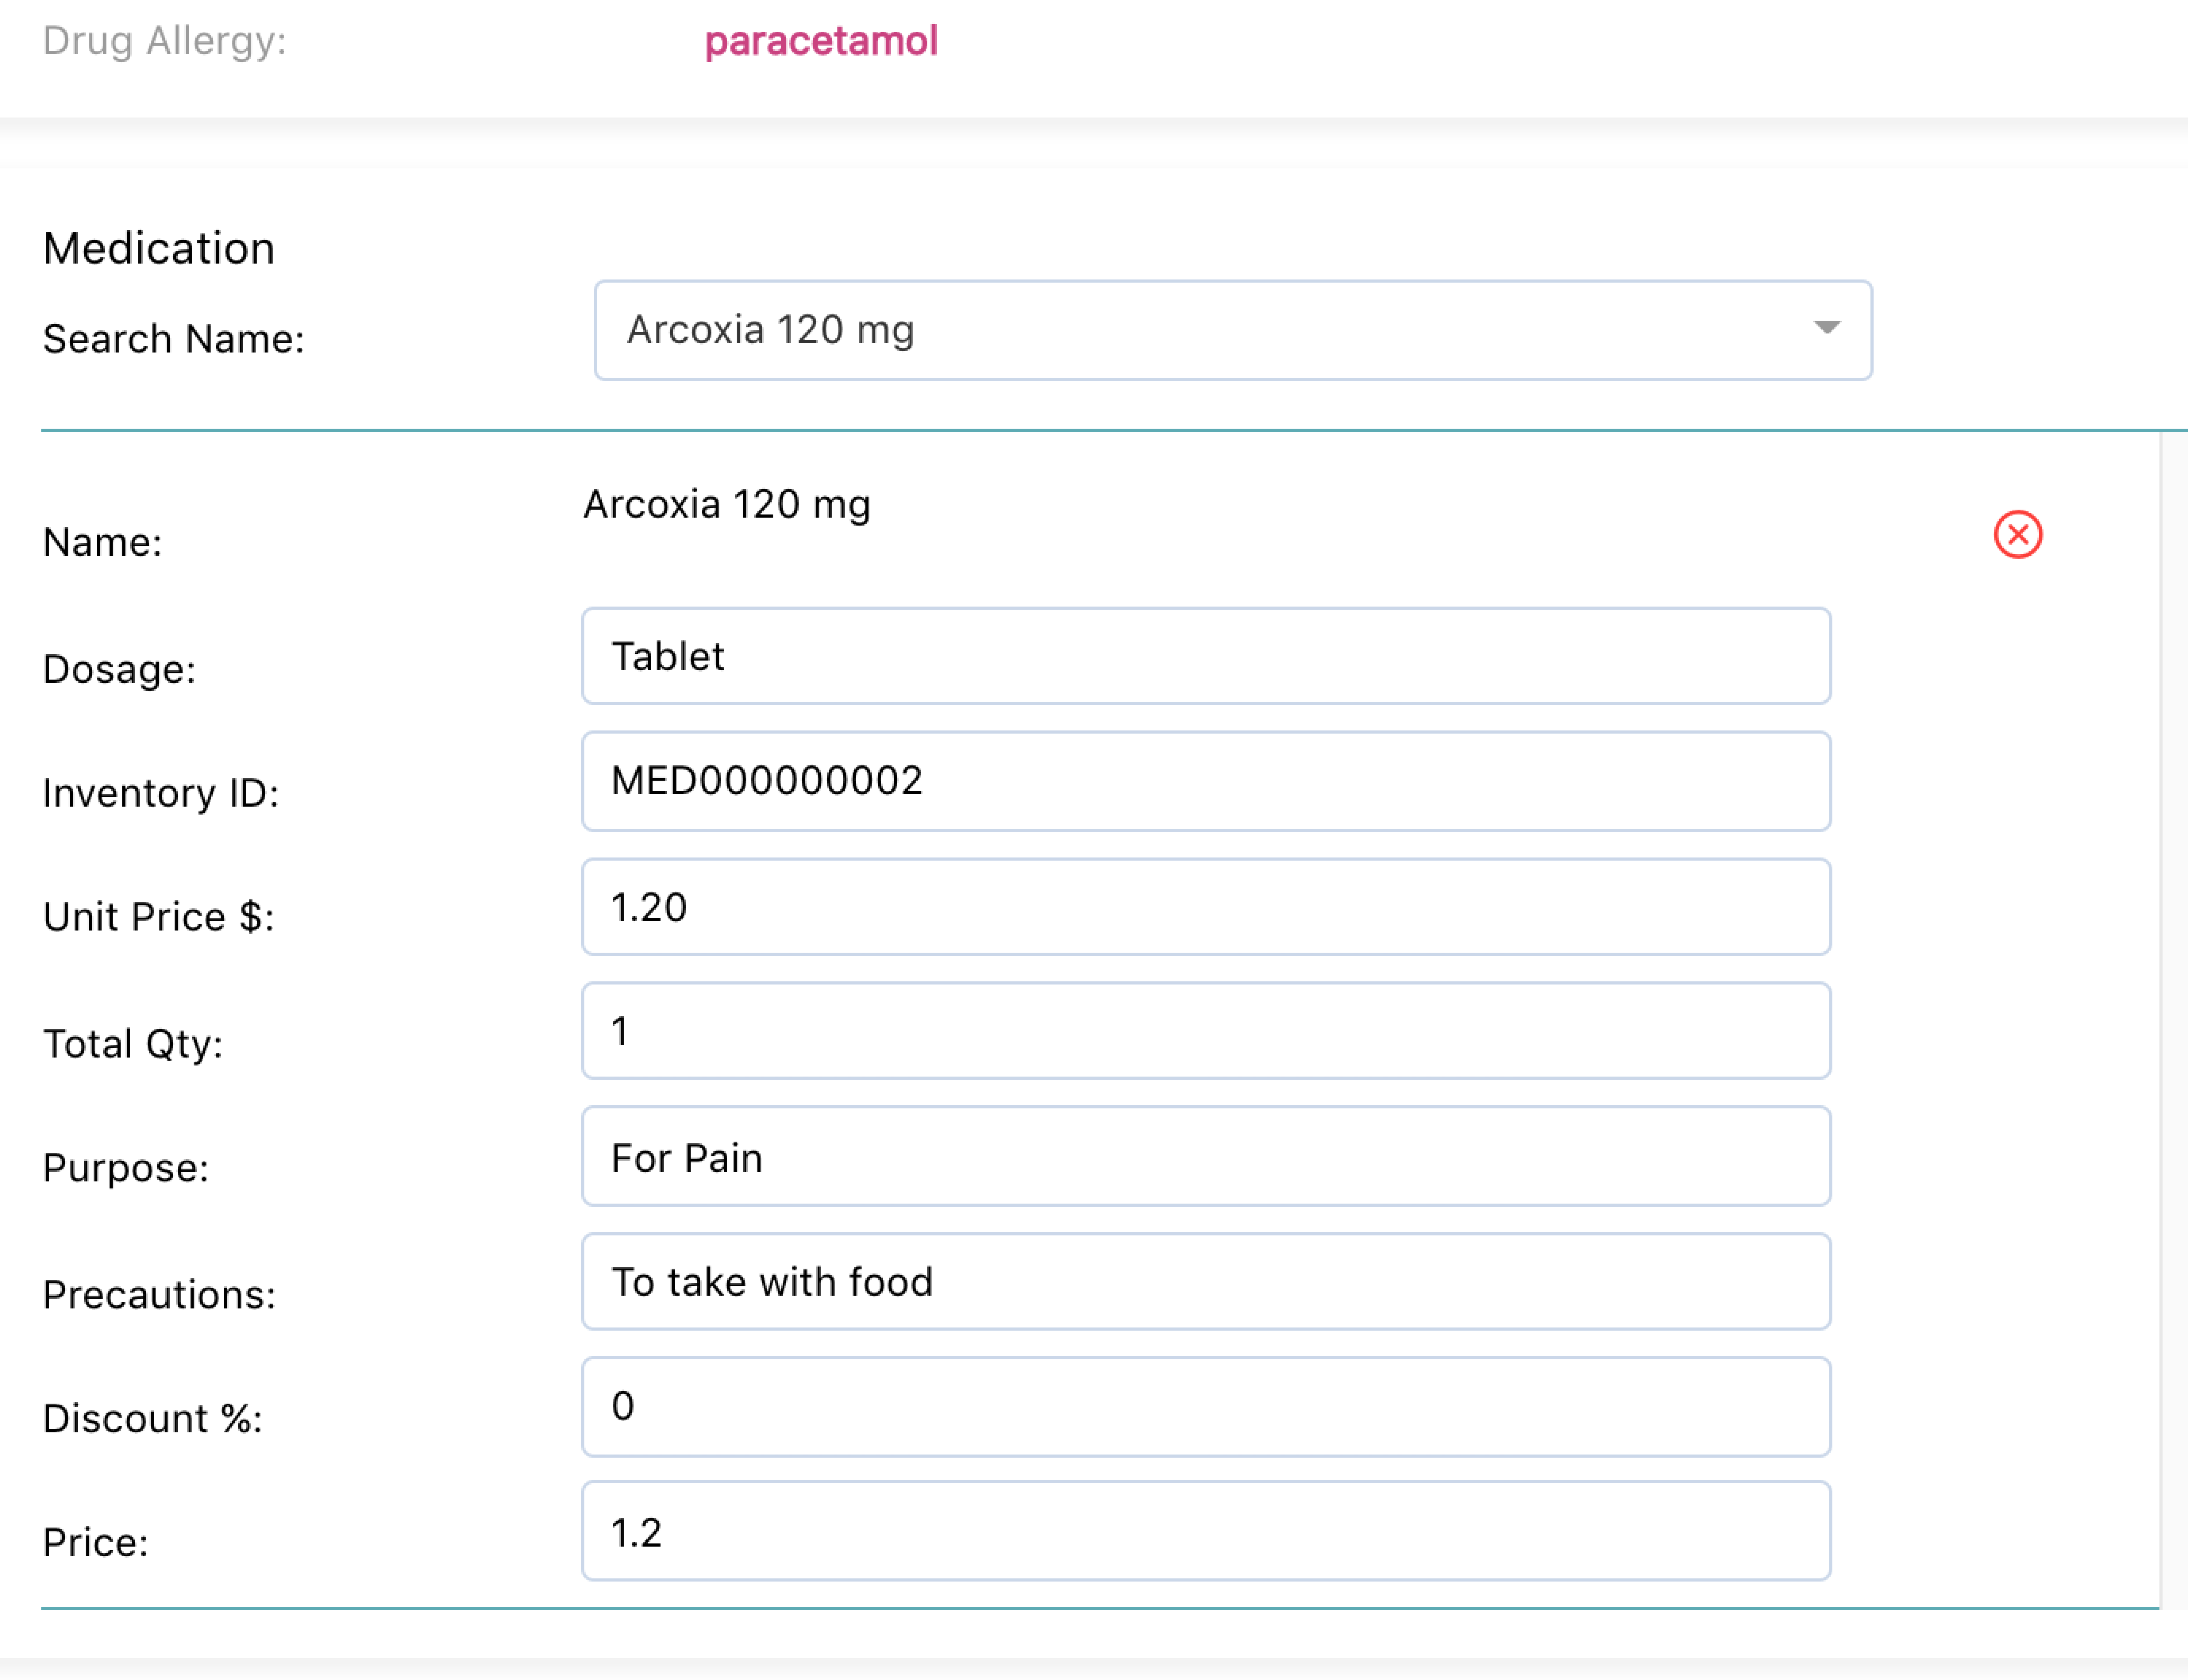
Fig 3.2 – example of how the medication section in teleconsult will look like after selecting it
During the video call, you will be able to prescribe medications by scrolling down to the medication section. Select from your list of medications in the dropdown. You can edit the quantity, price, discount of the medication.
After the video calls, in consultation summary, providers can continue editing and add more medication as required.
Q) 4.7.3 How to set up medications?
You can enter your medication list under the “Medication List” tab located under settings.
You can either upload your medication list in and or add medication manually.
Medication details input:
- Upload Medications (Upload medication list in excel format)
- Add Medication (individually, manually enter medication details)
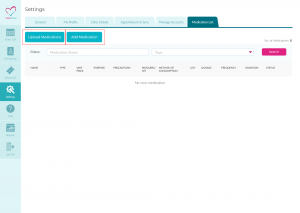
Fig 18.0 Medication list
Q) 4.7.4 How to manually add medication?
Fill in the medication information according to the form as shown below.
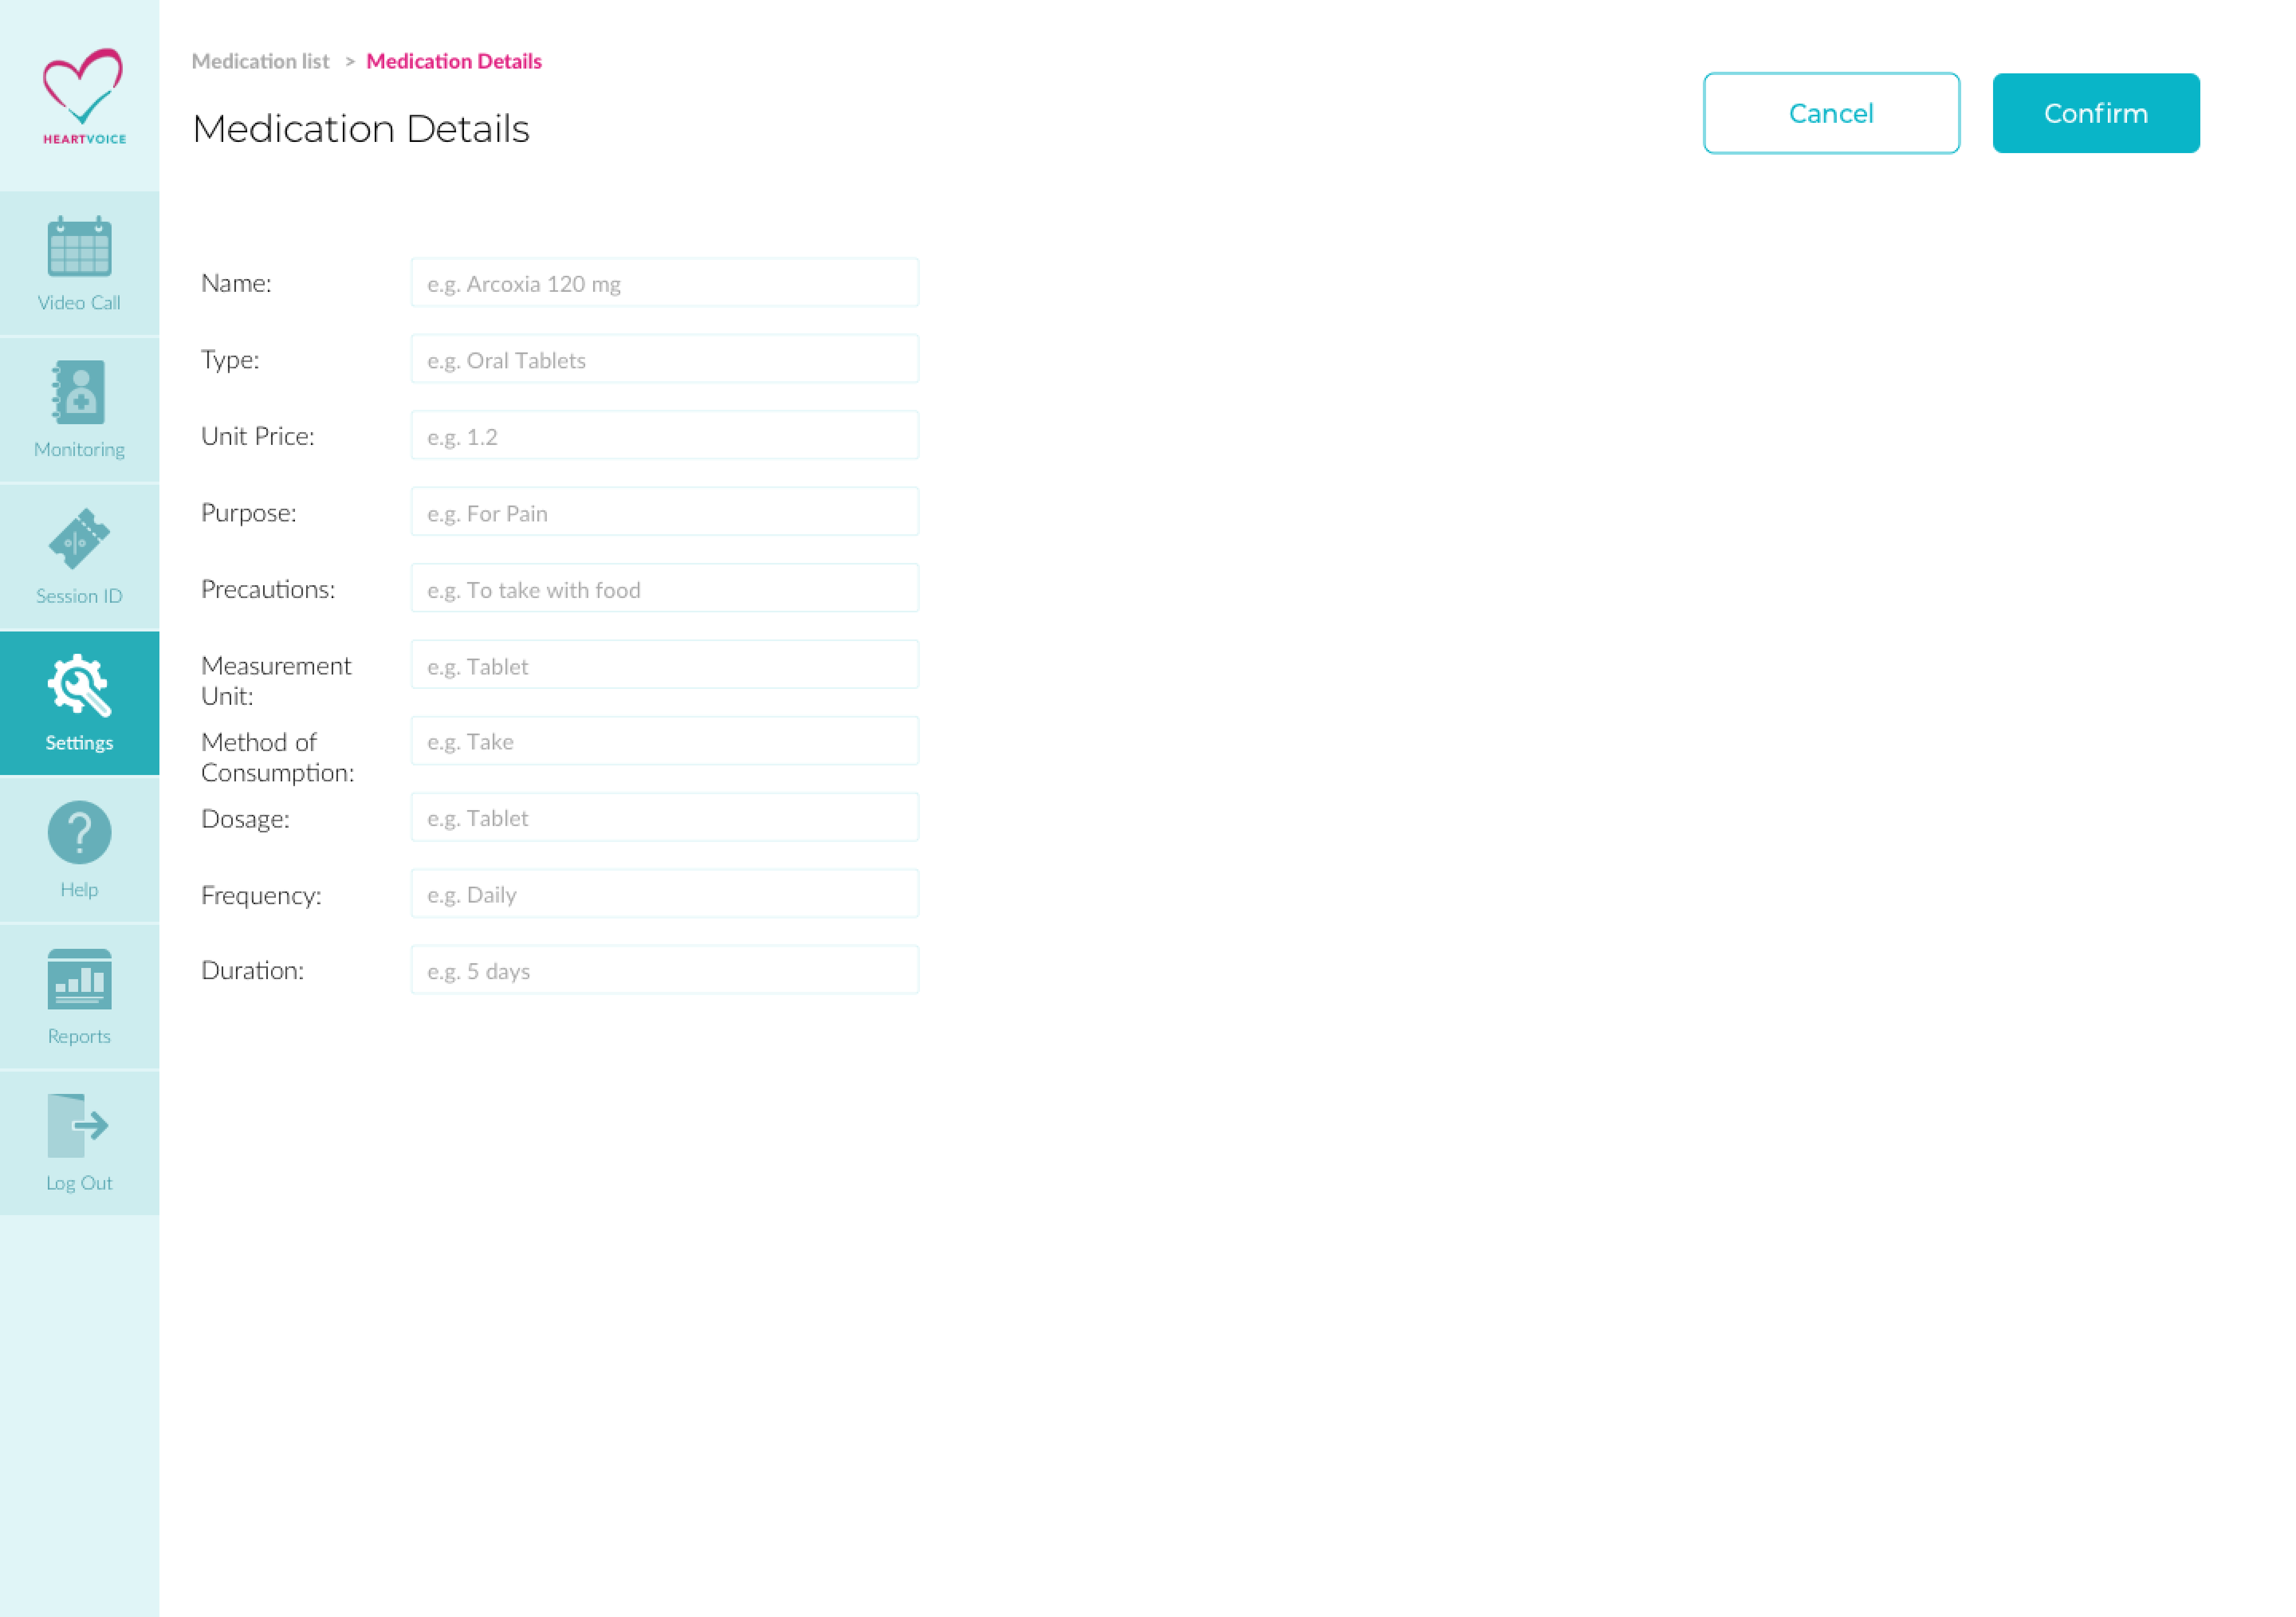
Fig 18.1 Medication information details
*Please note all fields are compulsory. Unit price, quantity must be a numerical value. You can complete fields with “-” if they are not required.
Q) 4.7.5 How to upload medications settings with template?
- Click on “upload medications” button
- Download the medication template
- Fill in the medication in the medication template
- Browse OR drag & drop your document
- Click on “Confirm”
- Show “Upload Medications List Success!”
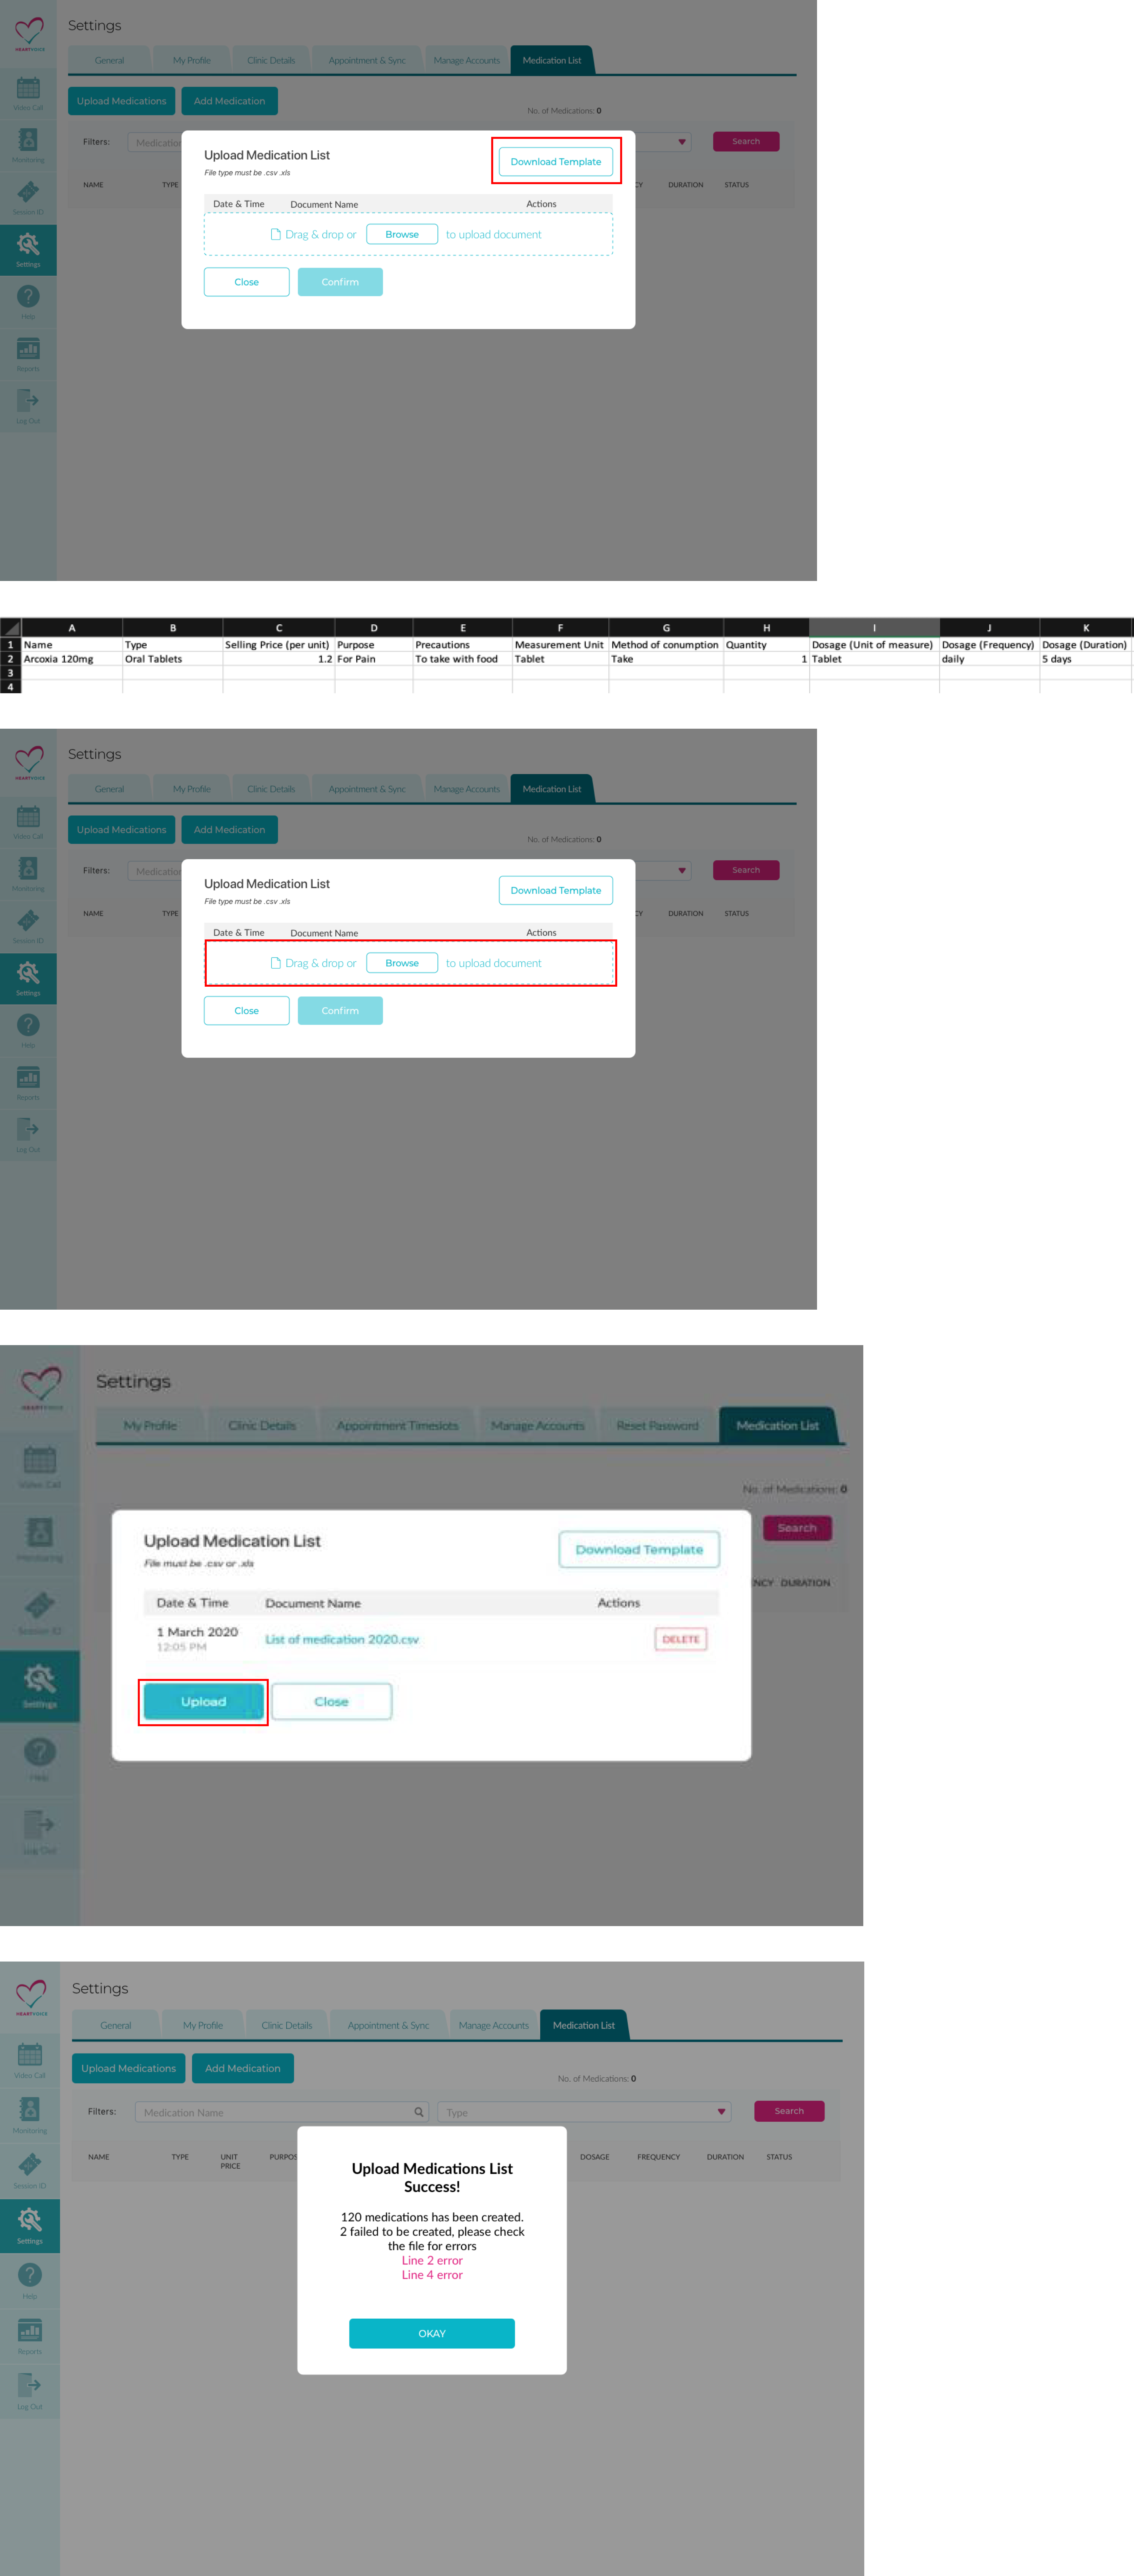
Fig 18.3 upload medication flow
| List medication information | Details |
| Name | e.g. Arcoxia 120 mg |
| Type | E.g. Oral Tablets |
| Unit Price | e.g. 1.2 (up to 2 decimal, number only) |
| Purpose | E.g. For Pain |
| Precautions | E.g. To take with food |
| Measurement Unit | E.g. Tablet |
| Method of consumption | E.g. Take |
| Quantity | E.g. 1 (numbers only) |
| Dosage | E.g. Tablet |
| Frequency | E.g. Daily |
| Duration | E.g. 5 days |
| Status | Active / Inactive |
*Please note that the excel template fields are compulsory, content is unlimited except unit price, quantity. You can complete fields with “-” if they are not required. The medication templates needs to be in .csv .xls format. You can download this from your existing EMR / CMS system and fill in the HeartVoice medication template.
Below is an example of how the medication will be shown to the users.
Fig 18.4 example of how the medication will be shown to the users.
Q) 4.7.6 How to edit/delete medication?
- In medication list, select the medication that you would like to edit
- You can choose to either turn the status of the medication to “active” or “inactive”
- Make edits
- Click on “Delete” button to delete the medication OR Click on “Update” to update the changes made to the medication
- Pop up message to confirm update/delete. Click on “Yes”
You can also edit the medication when you are prescribing during or after consultation.
Fig 18.2 edit/delete medication
5.0: Referral and Promo Code
Q) 5.1 What is a provider referral code?
A provider referral code is a special code providers could share with users.
Q) 5.2 How does a user enter provider referral code?
Providers could share their referral code to users, and users would enter referral code when registering for our HeartVoice APP.
Fig 19.0 user flow – provider’s referral code
Q) 5.3 How do providers create their referral code?
Providers would not get to create their own referral code. Their own default referral code will be the same as the provider’s whatsapp code word. Providers will be able to see their own referral code under settings > go to your own profile > go to section “Share you contact with patients” .
Q) 5.4 Is it possible to edit our referral code?
No, the referral code will be created with the first whatsapp codeword that provider sets up.
Q) 5.5 What is a provider coupon code?
A provider coupon code is a personalised coupon code for users. Users can apply this coupon at checkout to enjoy discounts. The code is the same as the referral code.
If you wish to create an additional coupon code or customise the amount of discount you wish to provide, please contact your account manager.
6.0: General
Q) 6.1 What do I need to use the HeartVoice dashboard?
HeartVoice Dashboard is best used with laptop/desktop on Google Chrome web browser.
If you do not have a chrome browser, please download here.
https://www.google.com/chrome/
Providers will also need a front facing camera to conduct video consultation with users.
The first time you start a video consultation, you will be prompted to grant permission for microphone and camera, please select ALLOW.
Fig 20.0 allow permission for camera and microphone
Q) 6.2 My video is not showing
In chrome browser, please check that permission is turned. click the video icon in the browser search box, check that your option is set to “Continue showing” > click done.

Fig 20.1 allow permission for camera and microphone
Q) 6.3 How to reset your camera and video permission settings
Step 1: Open Chrome and select the Chrome menu, represented by three vertical dots in the top-right corner.
Step 2: Select Settings. “ … “
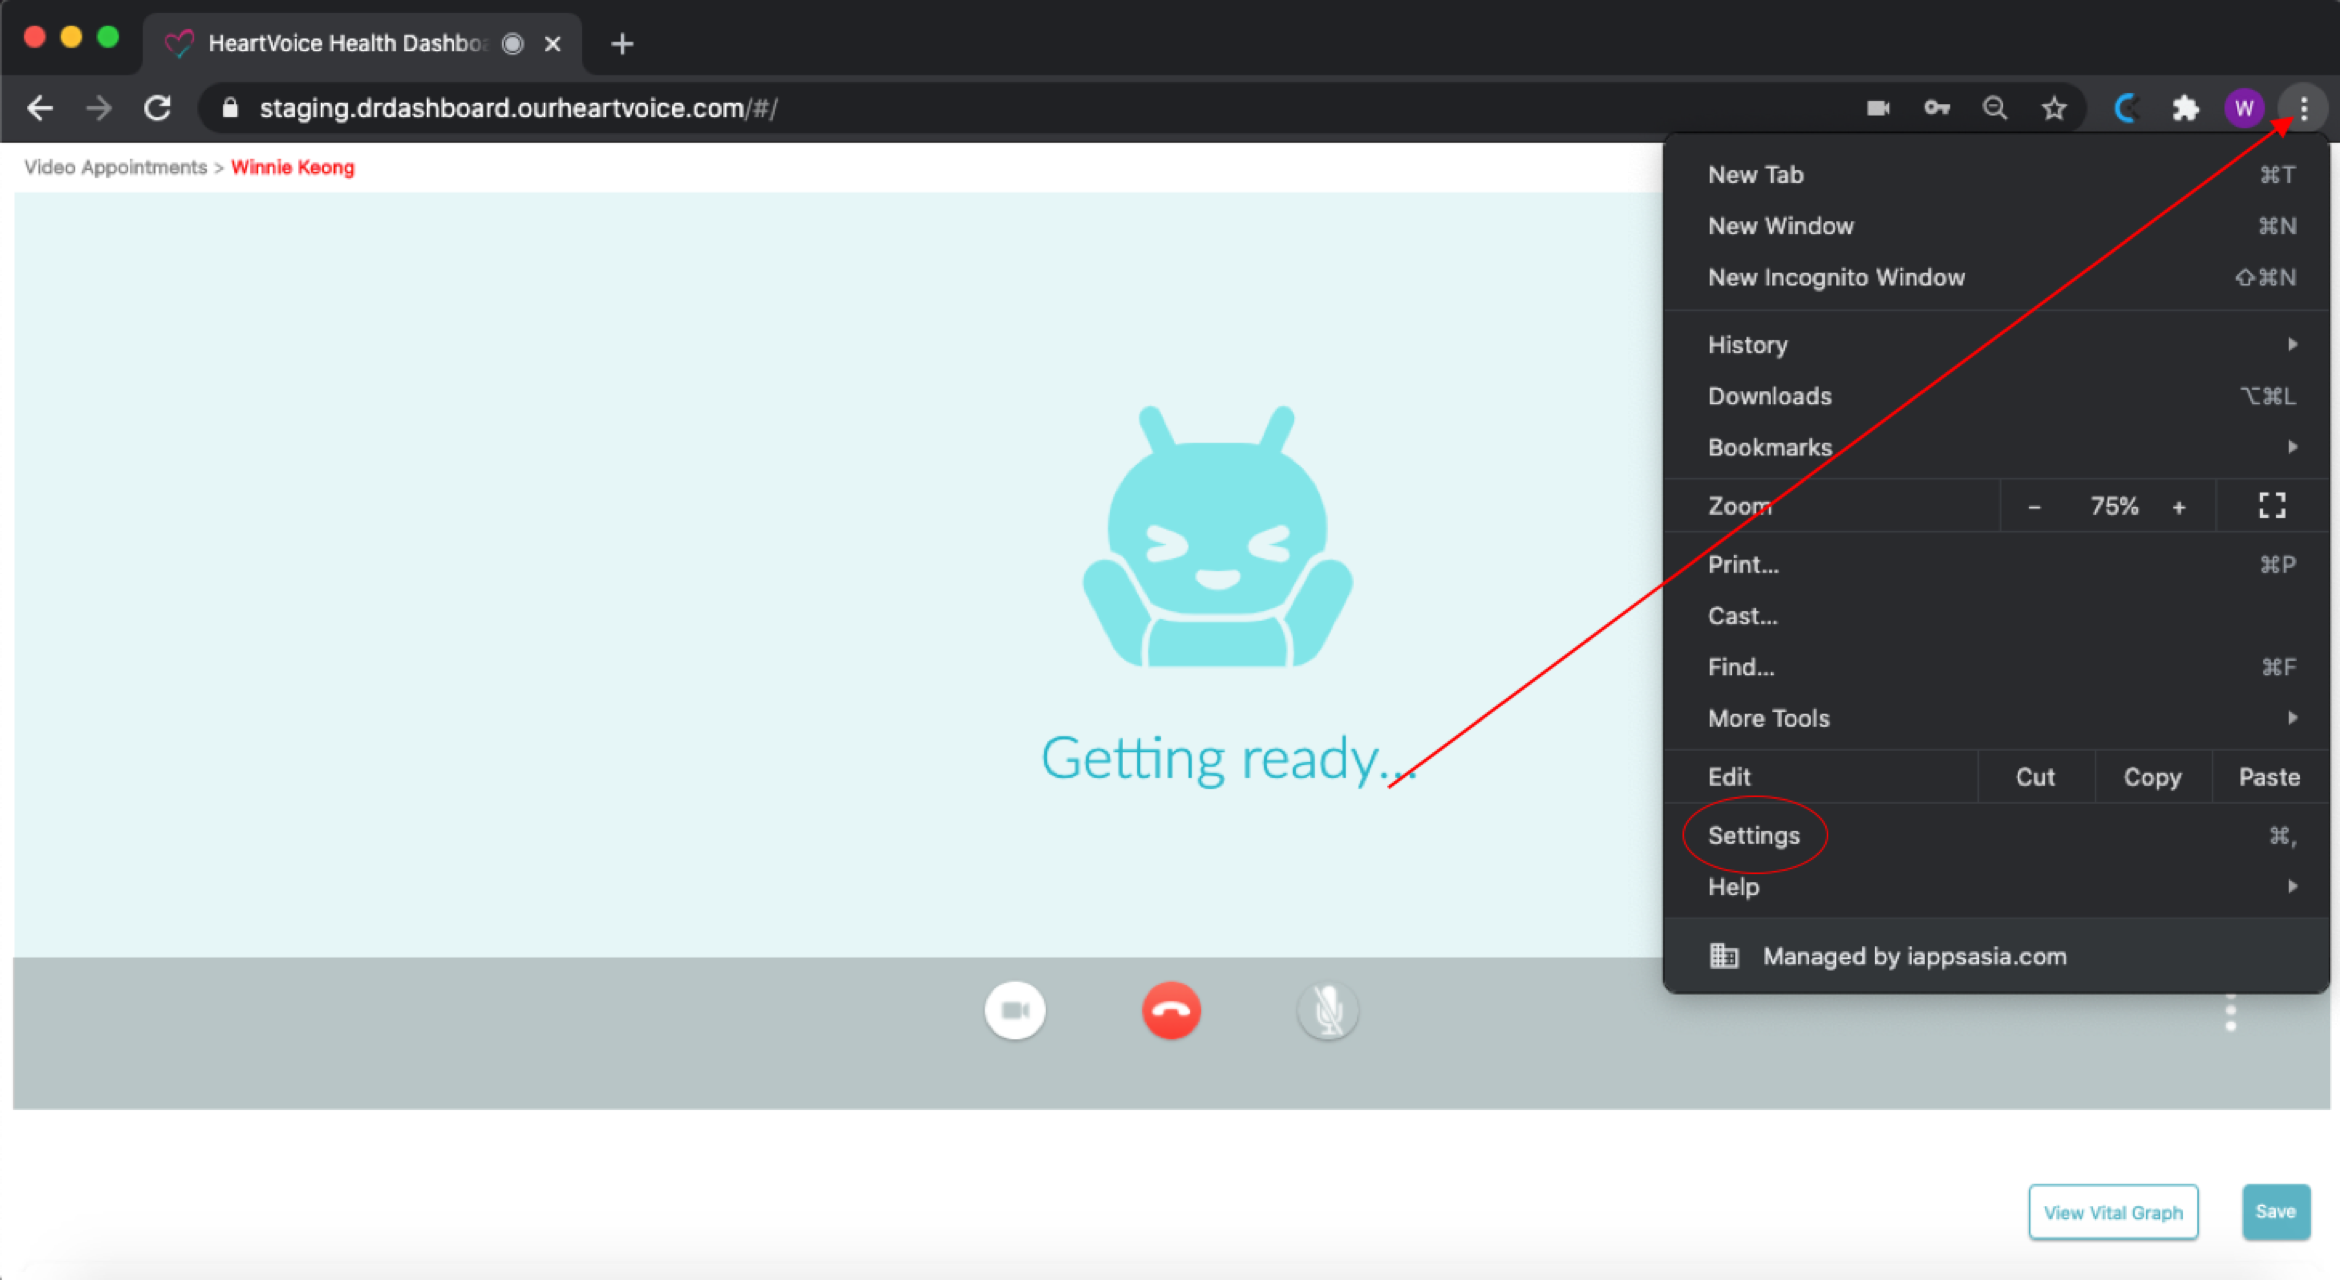
Fig 20.2 reset permission for camera and microphone
Step 3: Click on “Privacy and security” on the left hand side of the screen 3rd row
Step 4: Under the Privacy and security section, select “Site settings”.
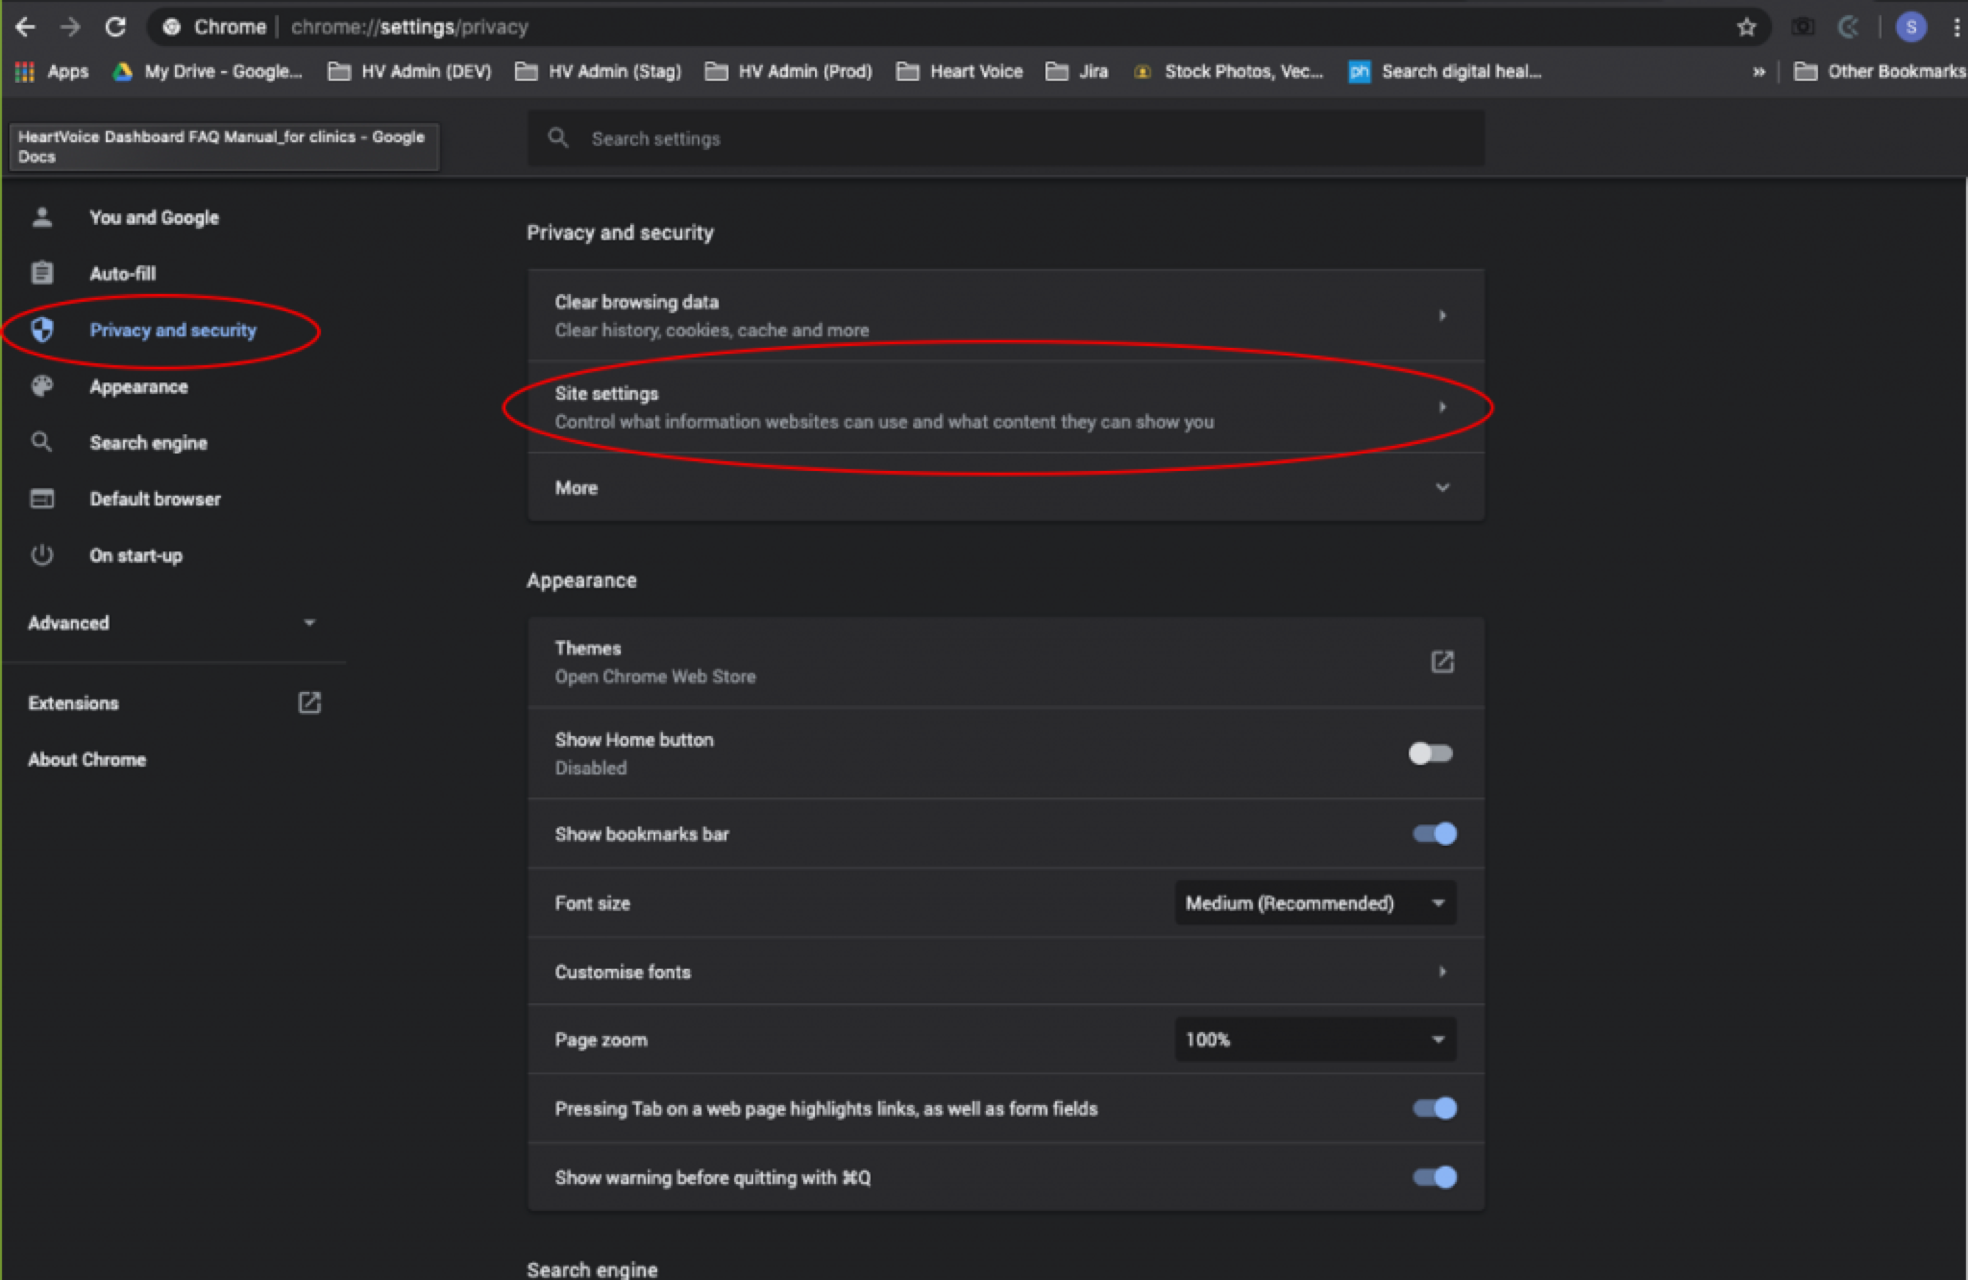
Fig 20.3.1 chrome settings
Step 5: Select “Camera” setting, and click on the trash icon to unblock it. Select “Microphone” setting, and click on the trash icon to unblock it.
Step 6:Login to dashboard, start a call > allow permission for microphone and camera.
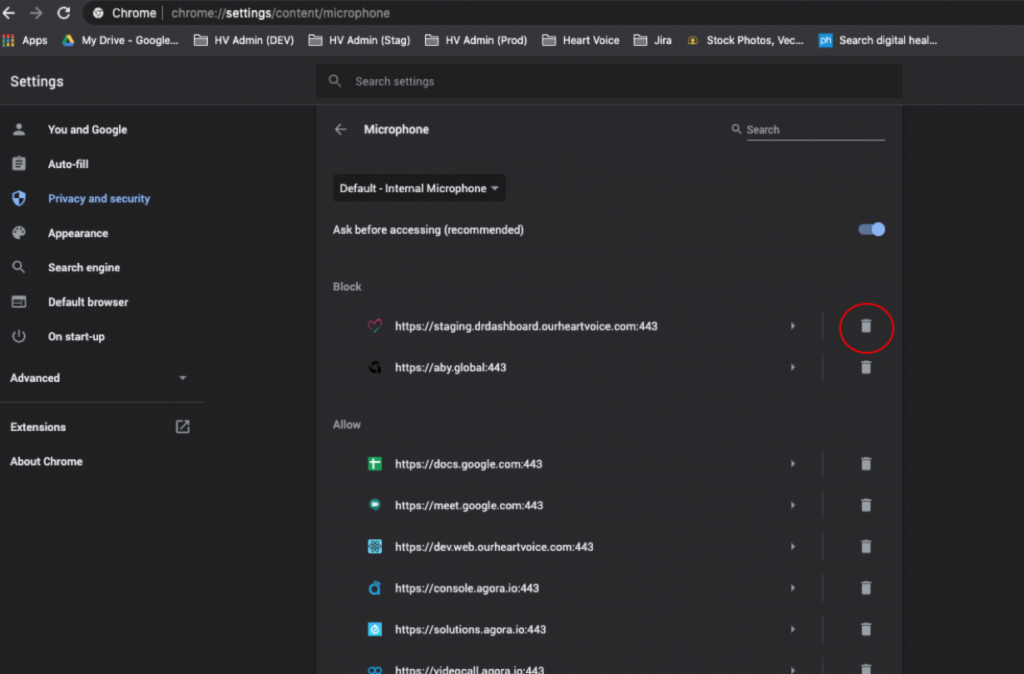
Fig 20.3.2 chrome settings
Q) 6.4 Set chrome as default browser
To automatically open links in chrome, please open chrome > go to settings > search engine > under default browser, set google as default.
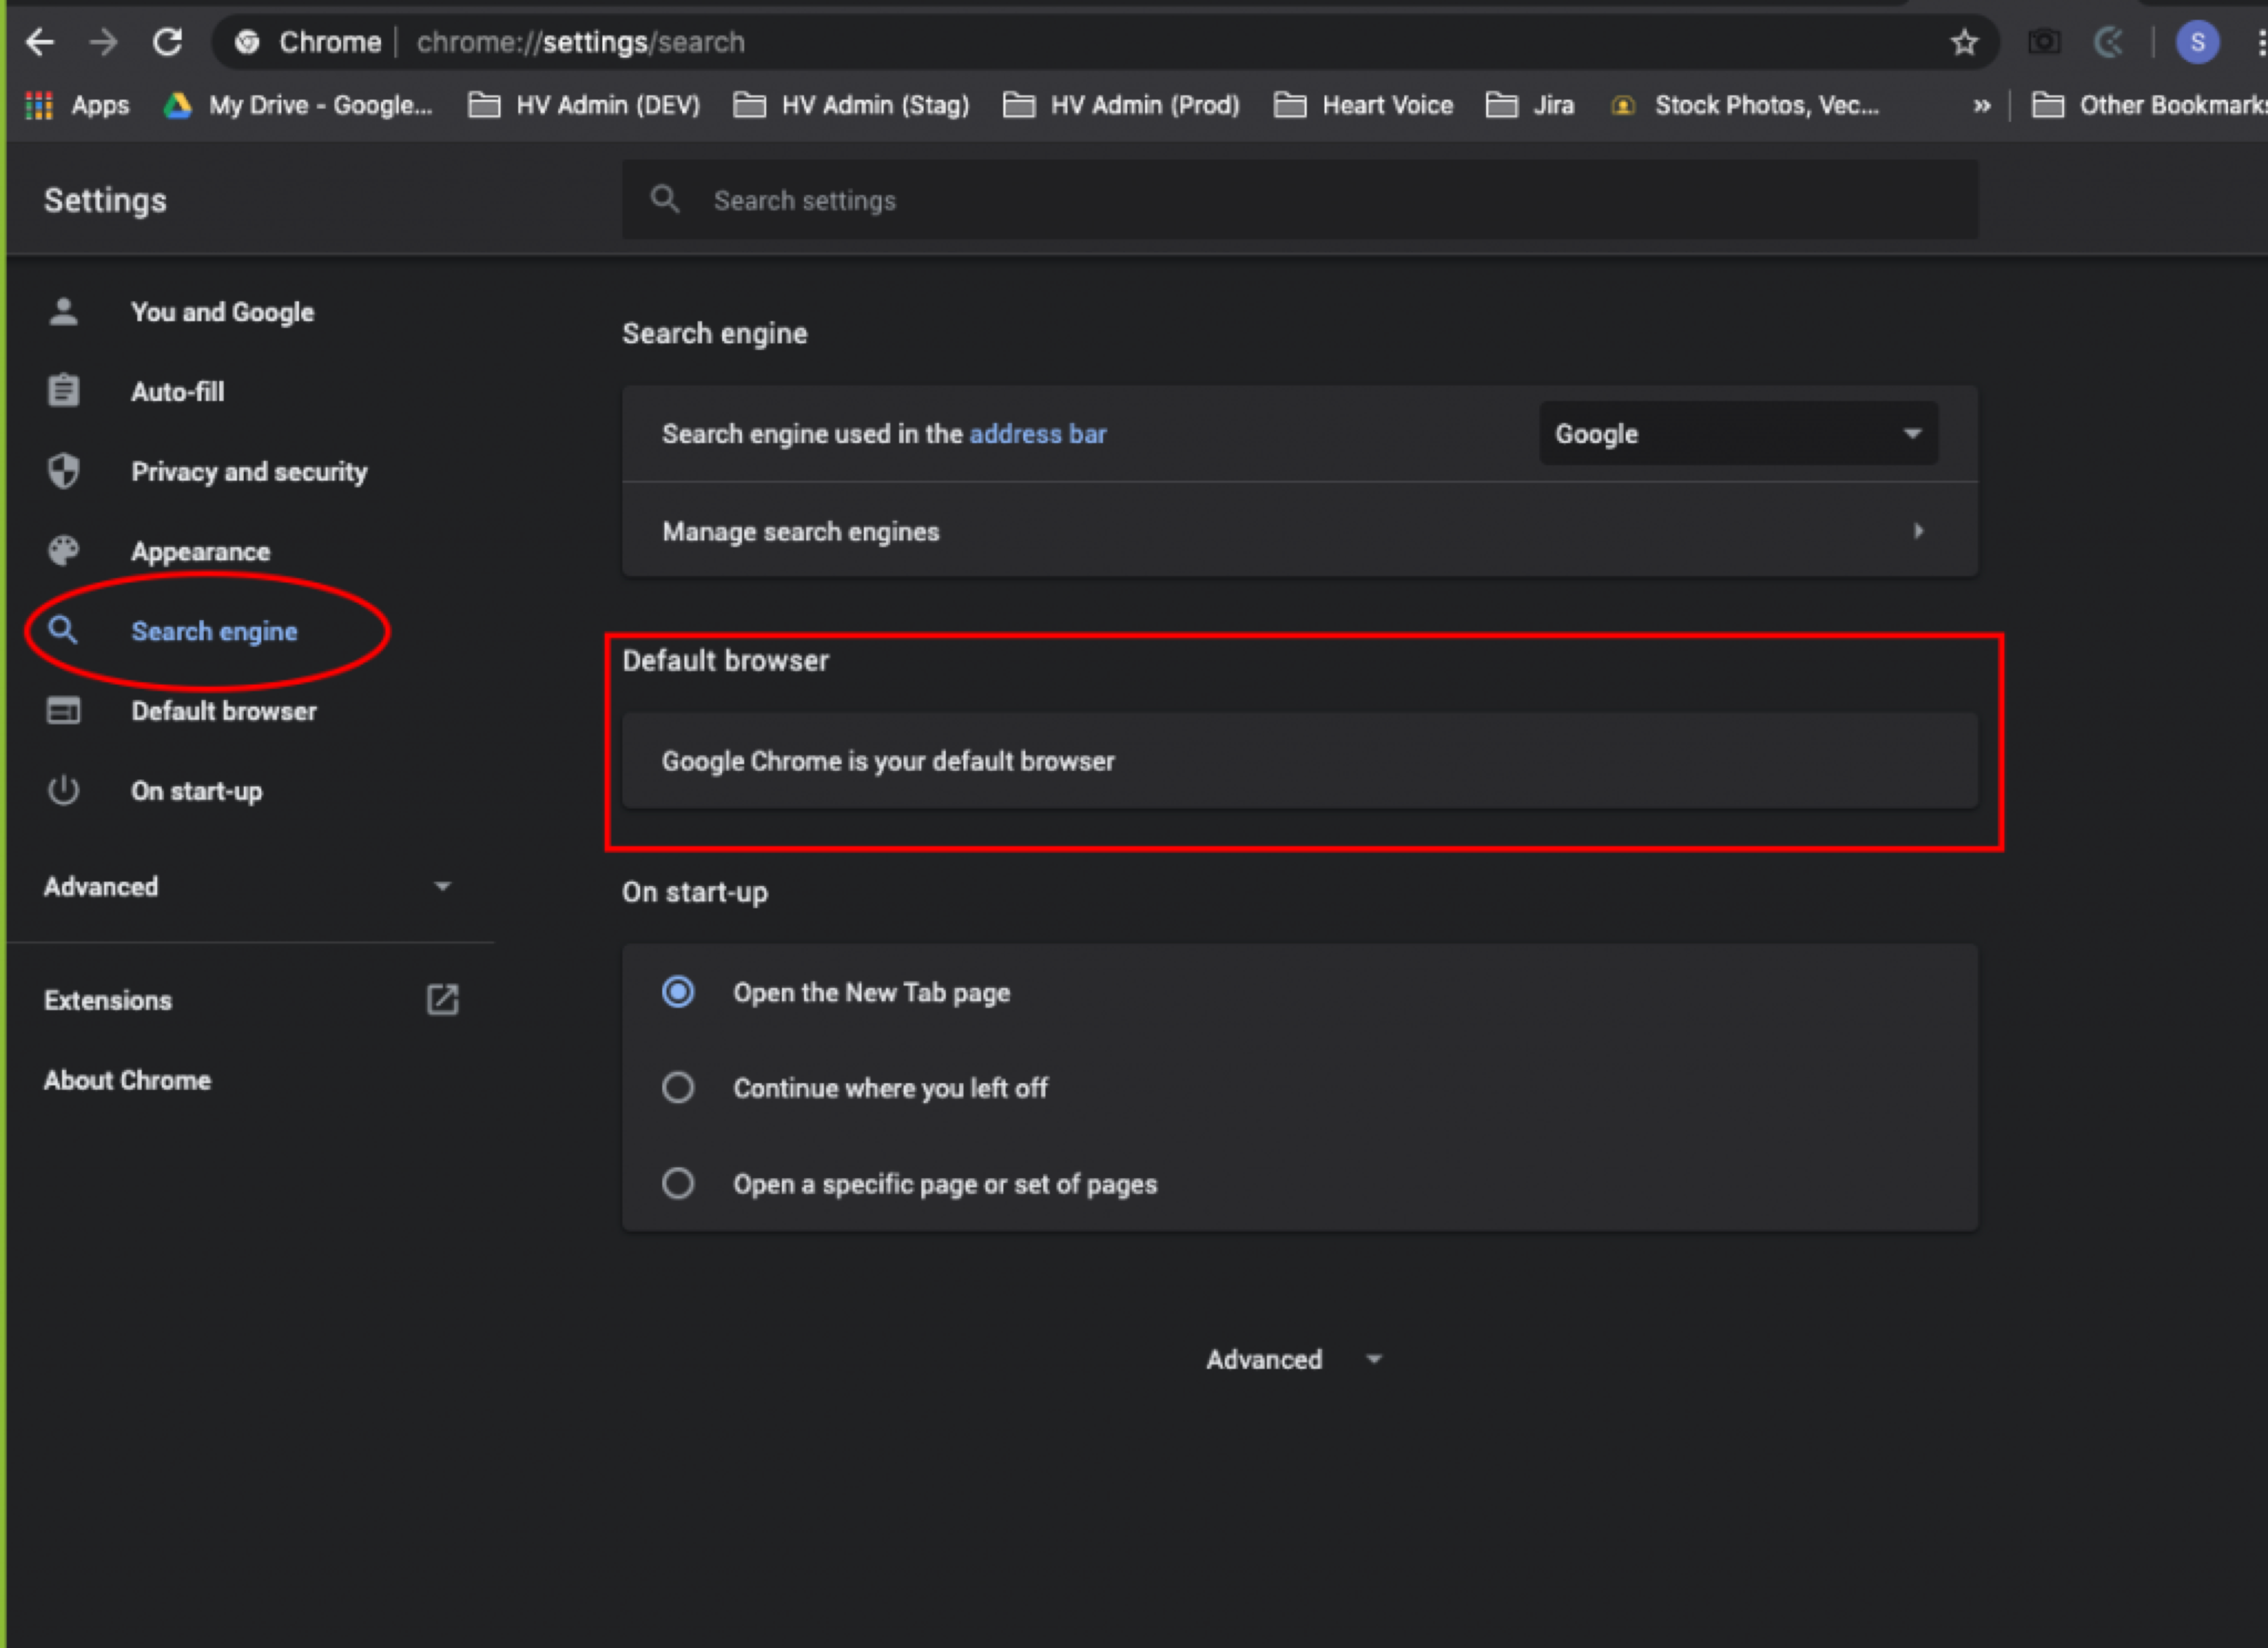
Fig 21.0 chrome default browser flow
Q) 6.5 How do I login?
A super admin account will be created with your clinic email to get started.
Once the email is registered, a reset password link will be sent to this email.
Please click the link, reset your password and login with the new password
Video: https://vimeo.com/432421554
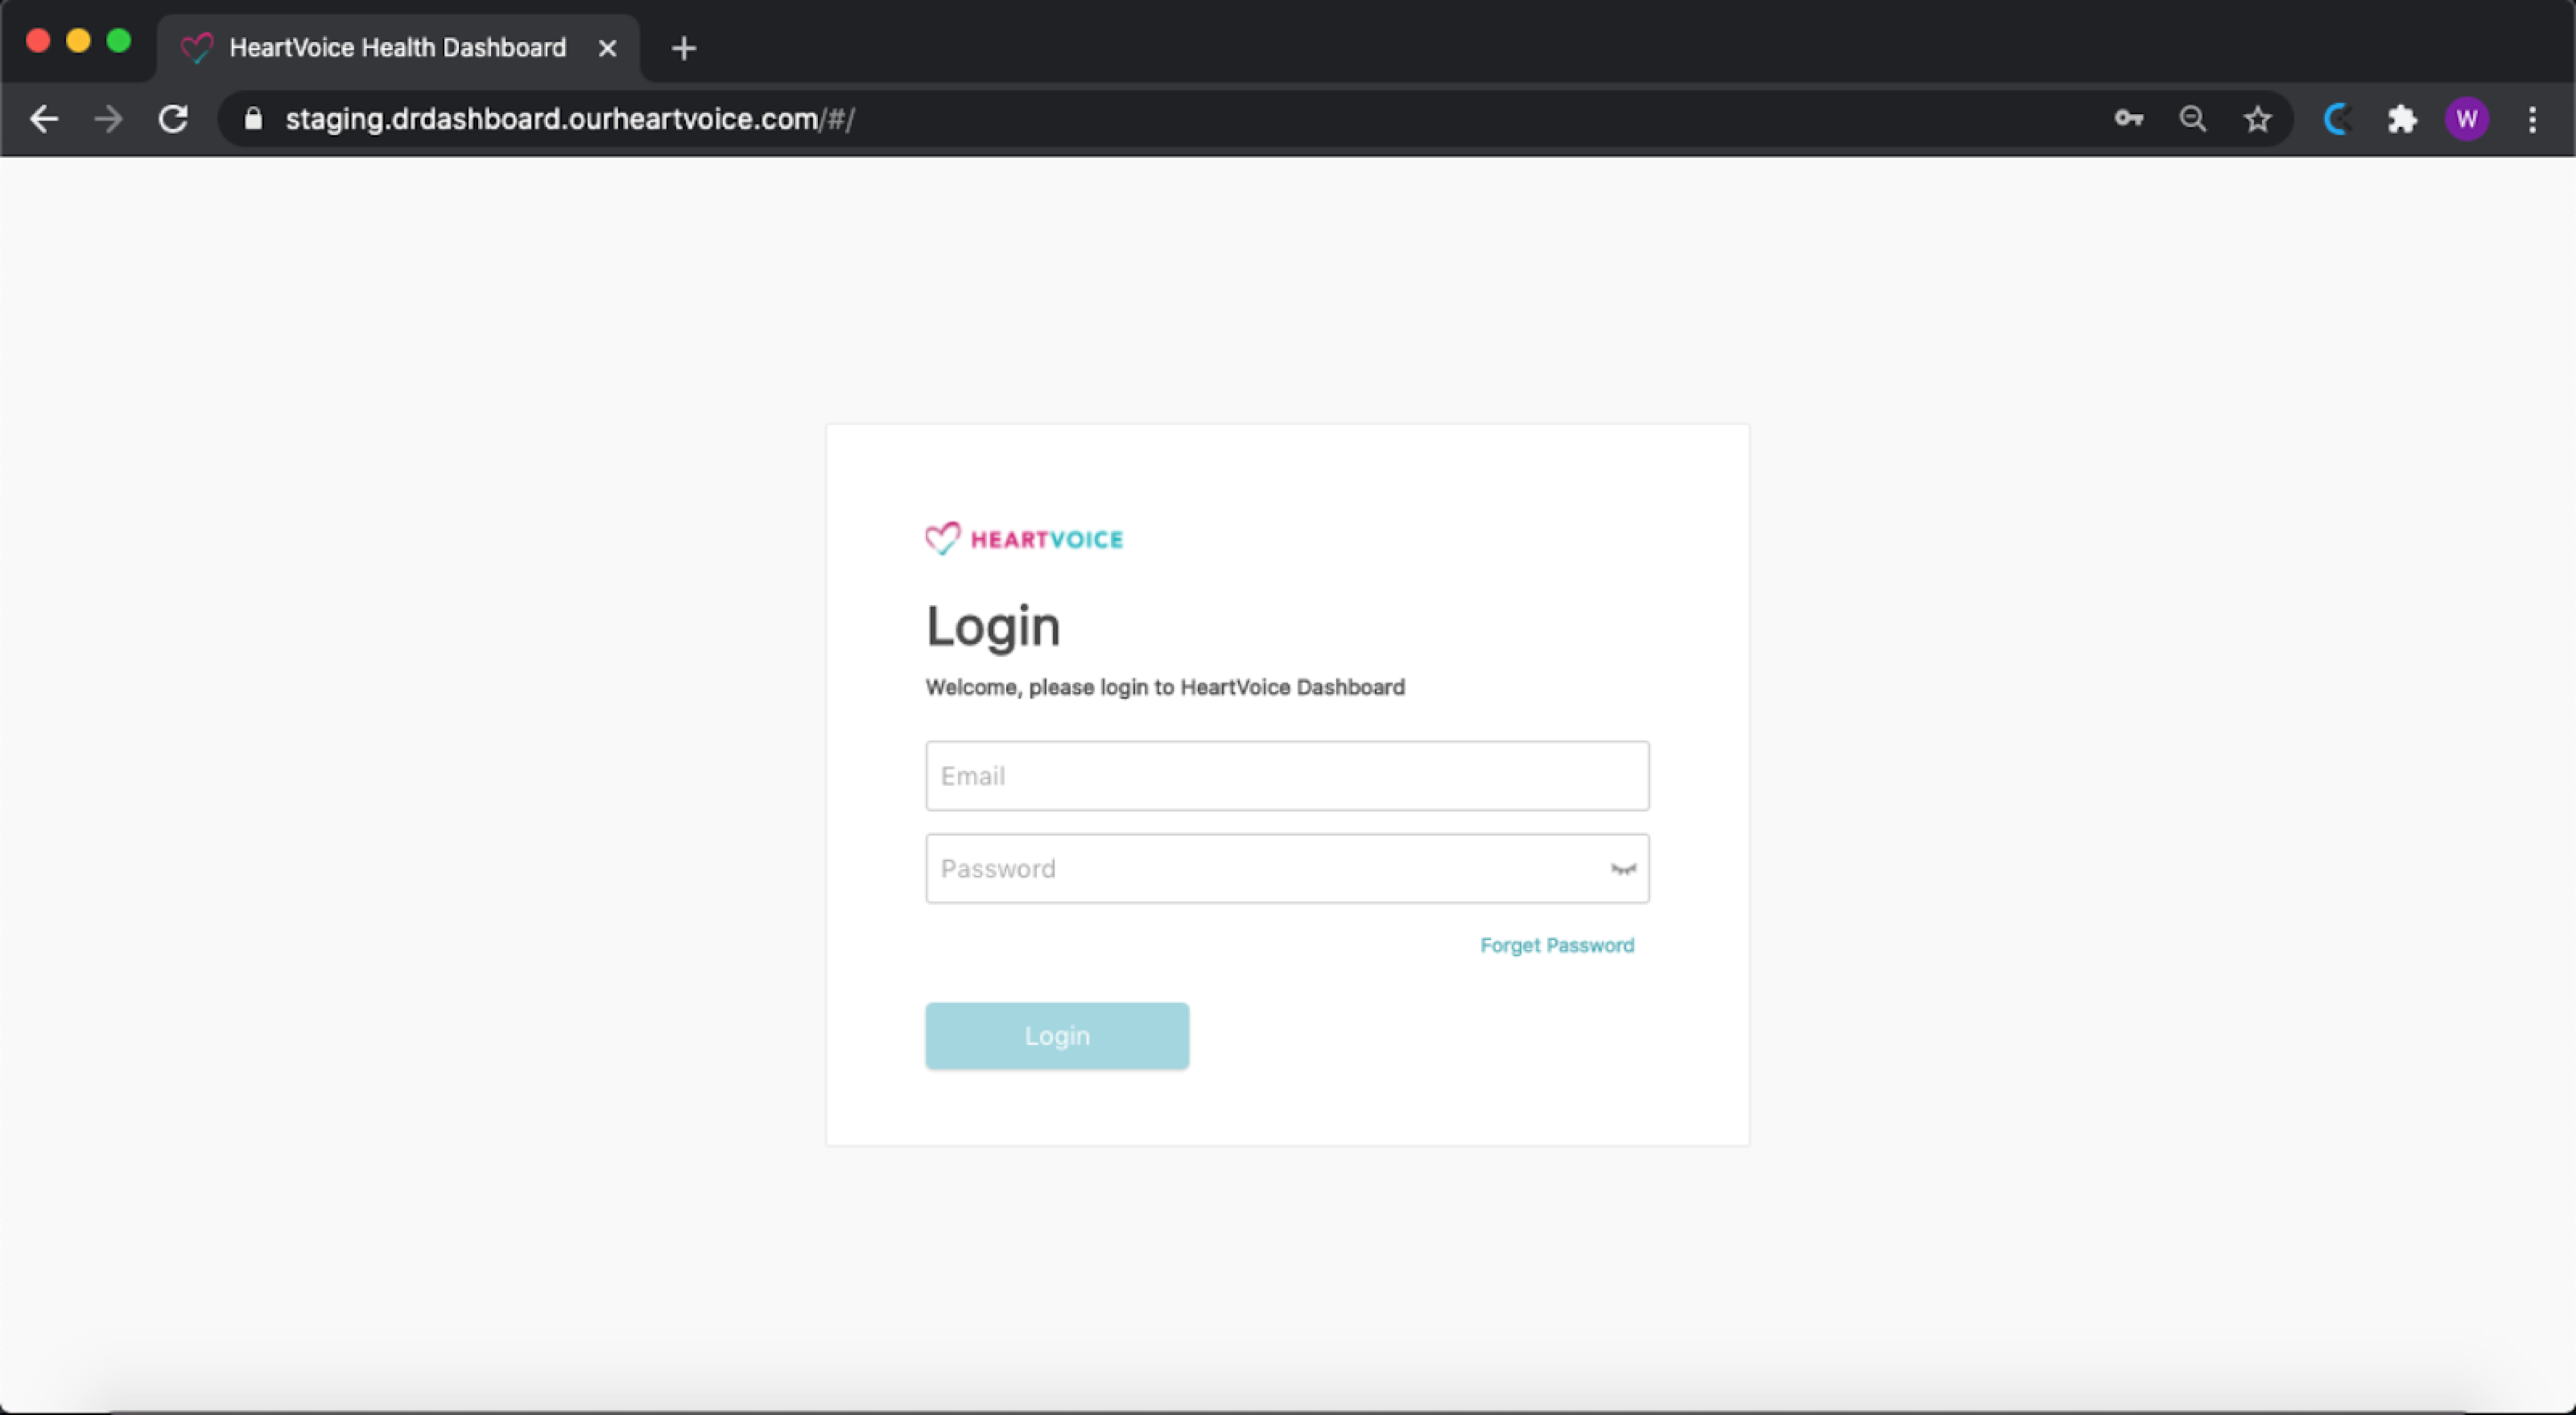
Fig 22.0 dr dashboard login page
Step 1: Open url https://drdashboard.ourheartvoice.com/#/
Step 2: Login with registered email and new password
Step 3: Check your email for an OTP and enter
Success! You are now logged in.
With the super admin account, you can create provider and staff accounts for the whole clinic.
- Urgent delivery (within 6 hours) at $50**Prices are before GST charges
Q) 6.6 I forgot my password, how do I login?
If you forget your password, simply click on the “forget password” located on the Dr Dashboard login screen. We will send you an email prompting you to set a new password.
Step 1: Click on “Forget password”
Step 2: Enter your email address
Step 3: Check email and set new password
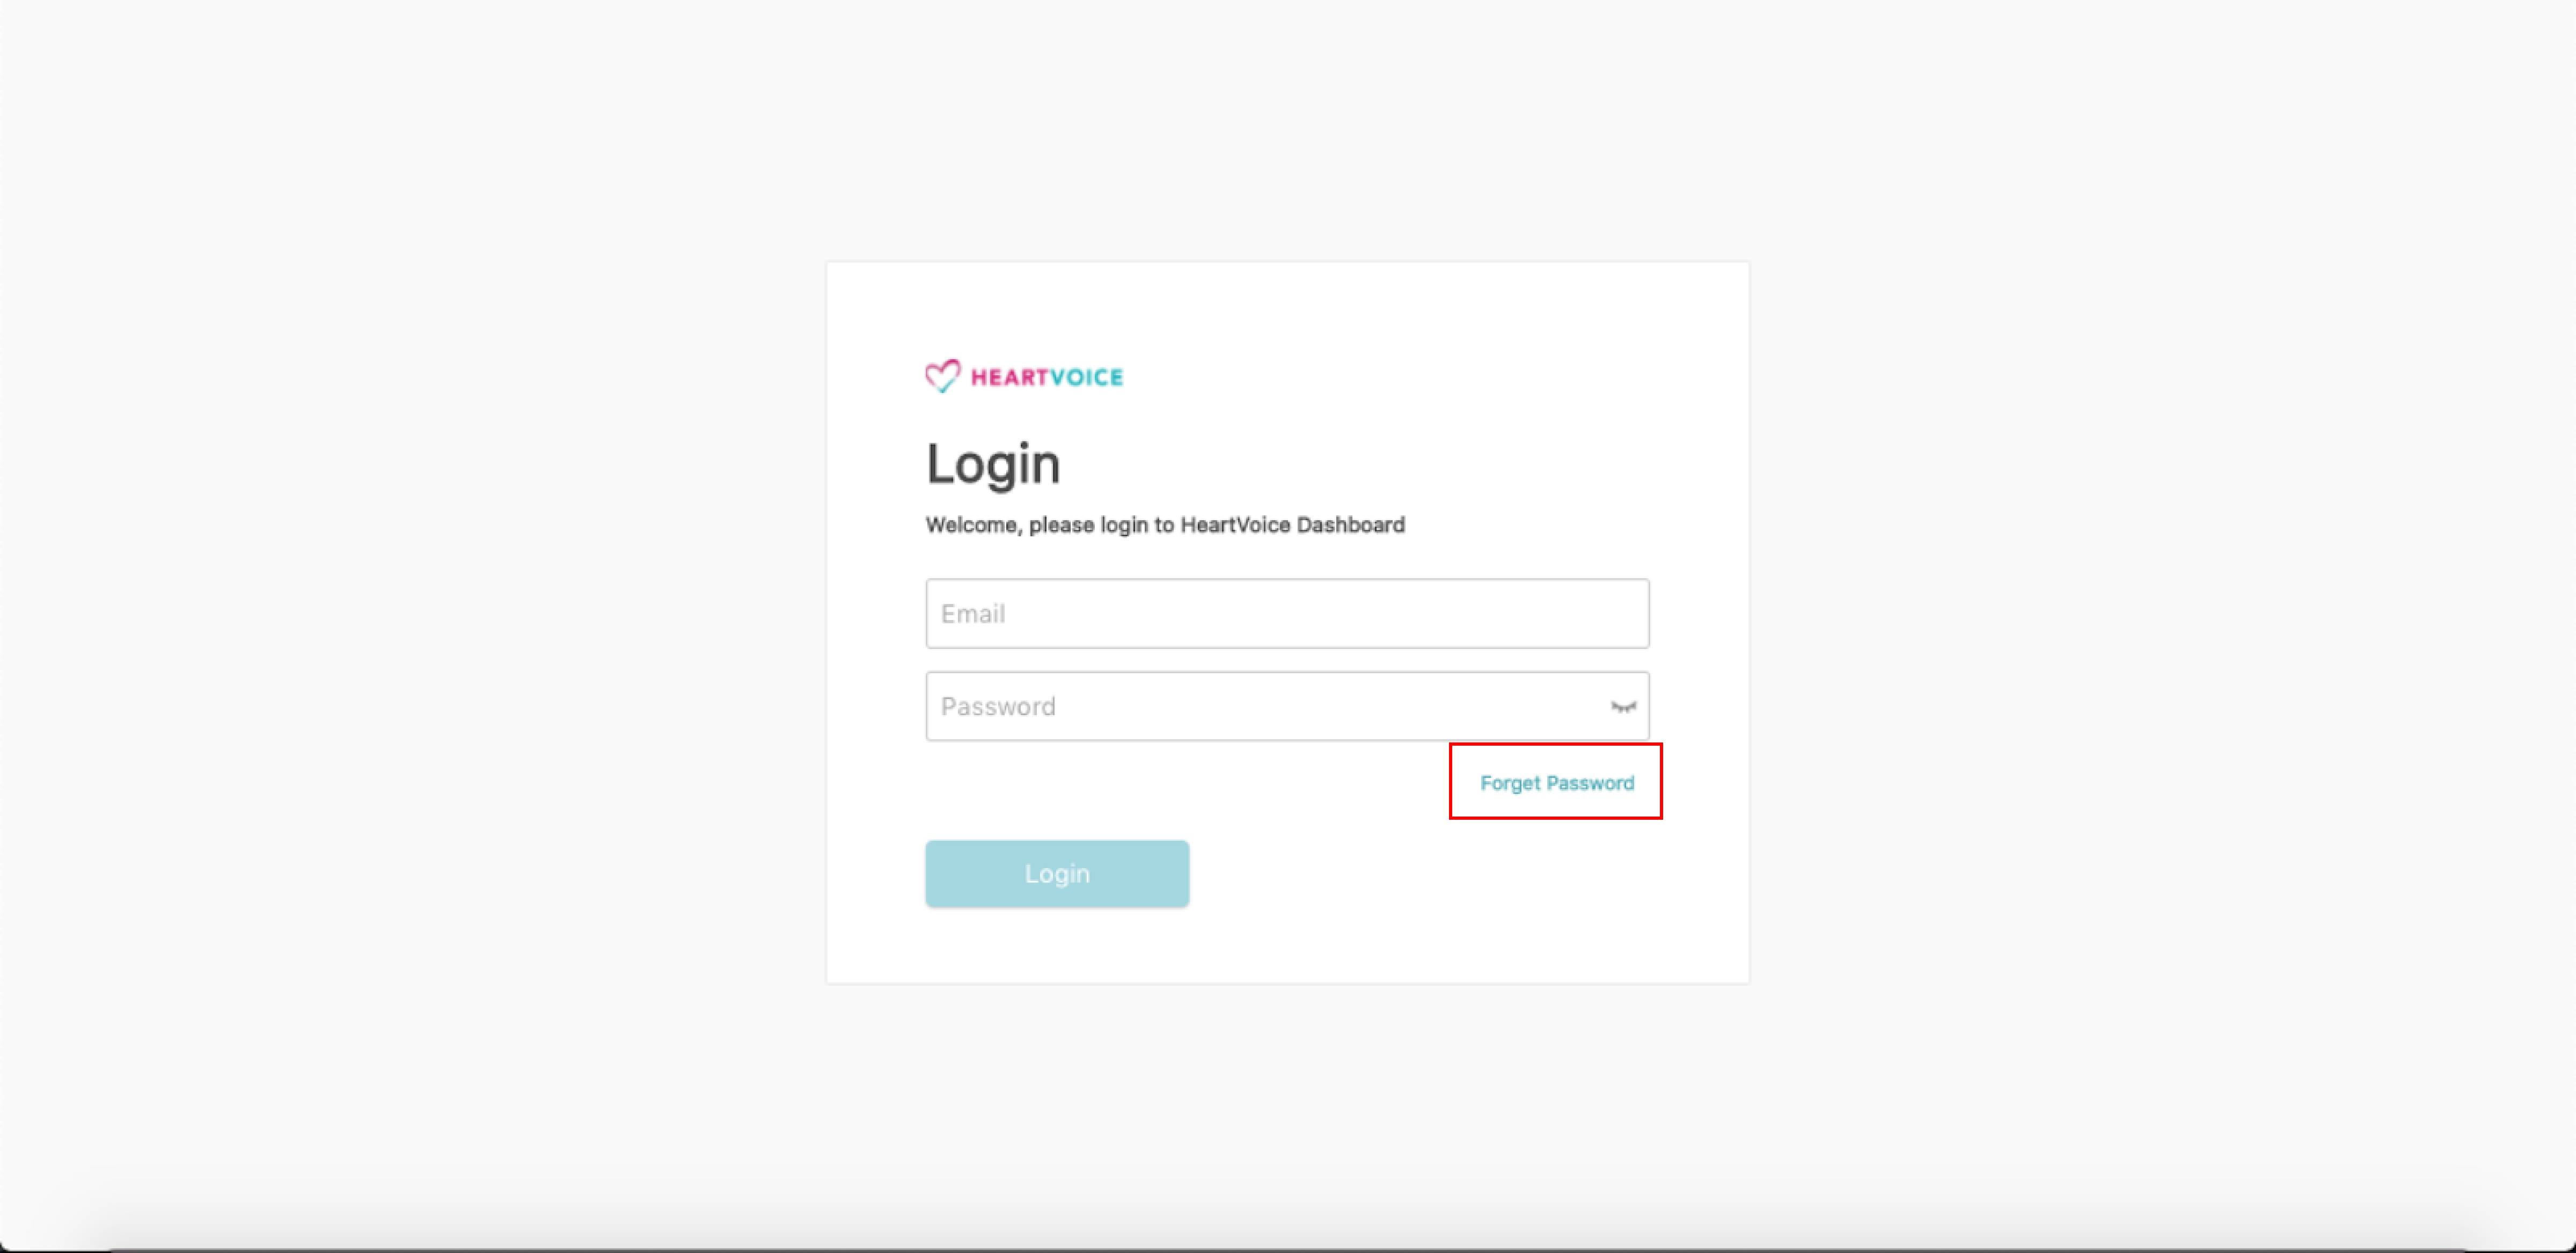
Fig 23.0 dr dashboard login page – forget password
Q) 6.7 How do I reset my password?
You can reset Password your password under “My Profile” Tab under settings.
Simply go to “My Profile” Tab and click on “reset password”.
Afterwards enter your old password first, followed by your new password and lastly your new password again. To see what you have entered, click on the eye icon to reveal what you have typed.
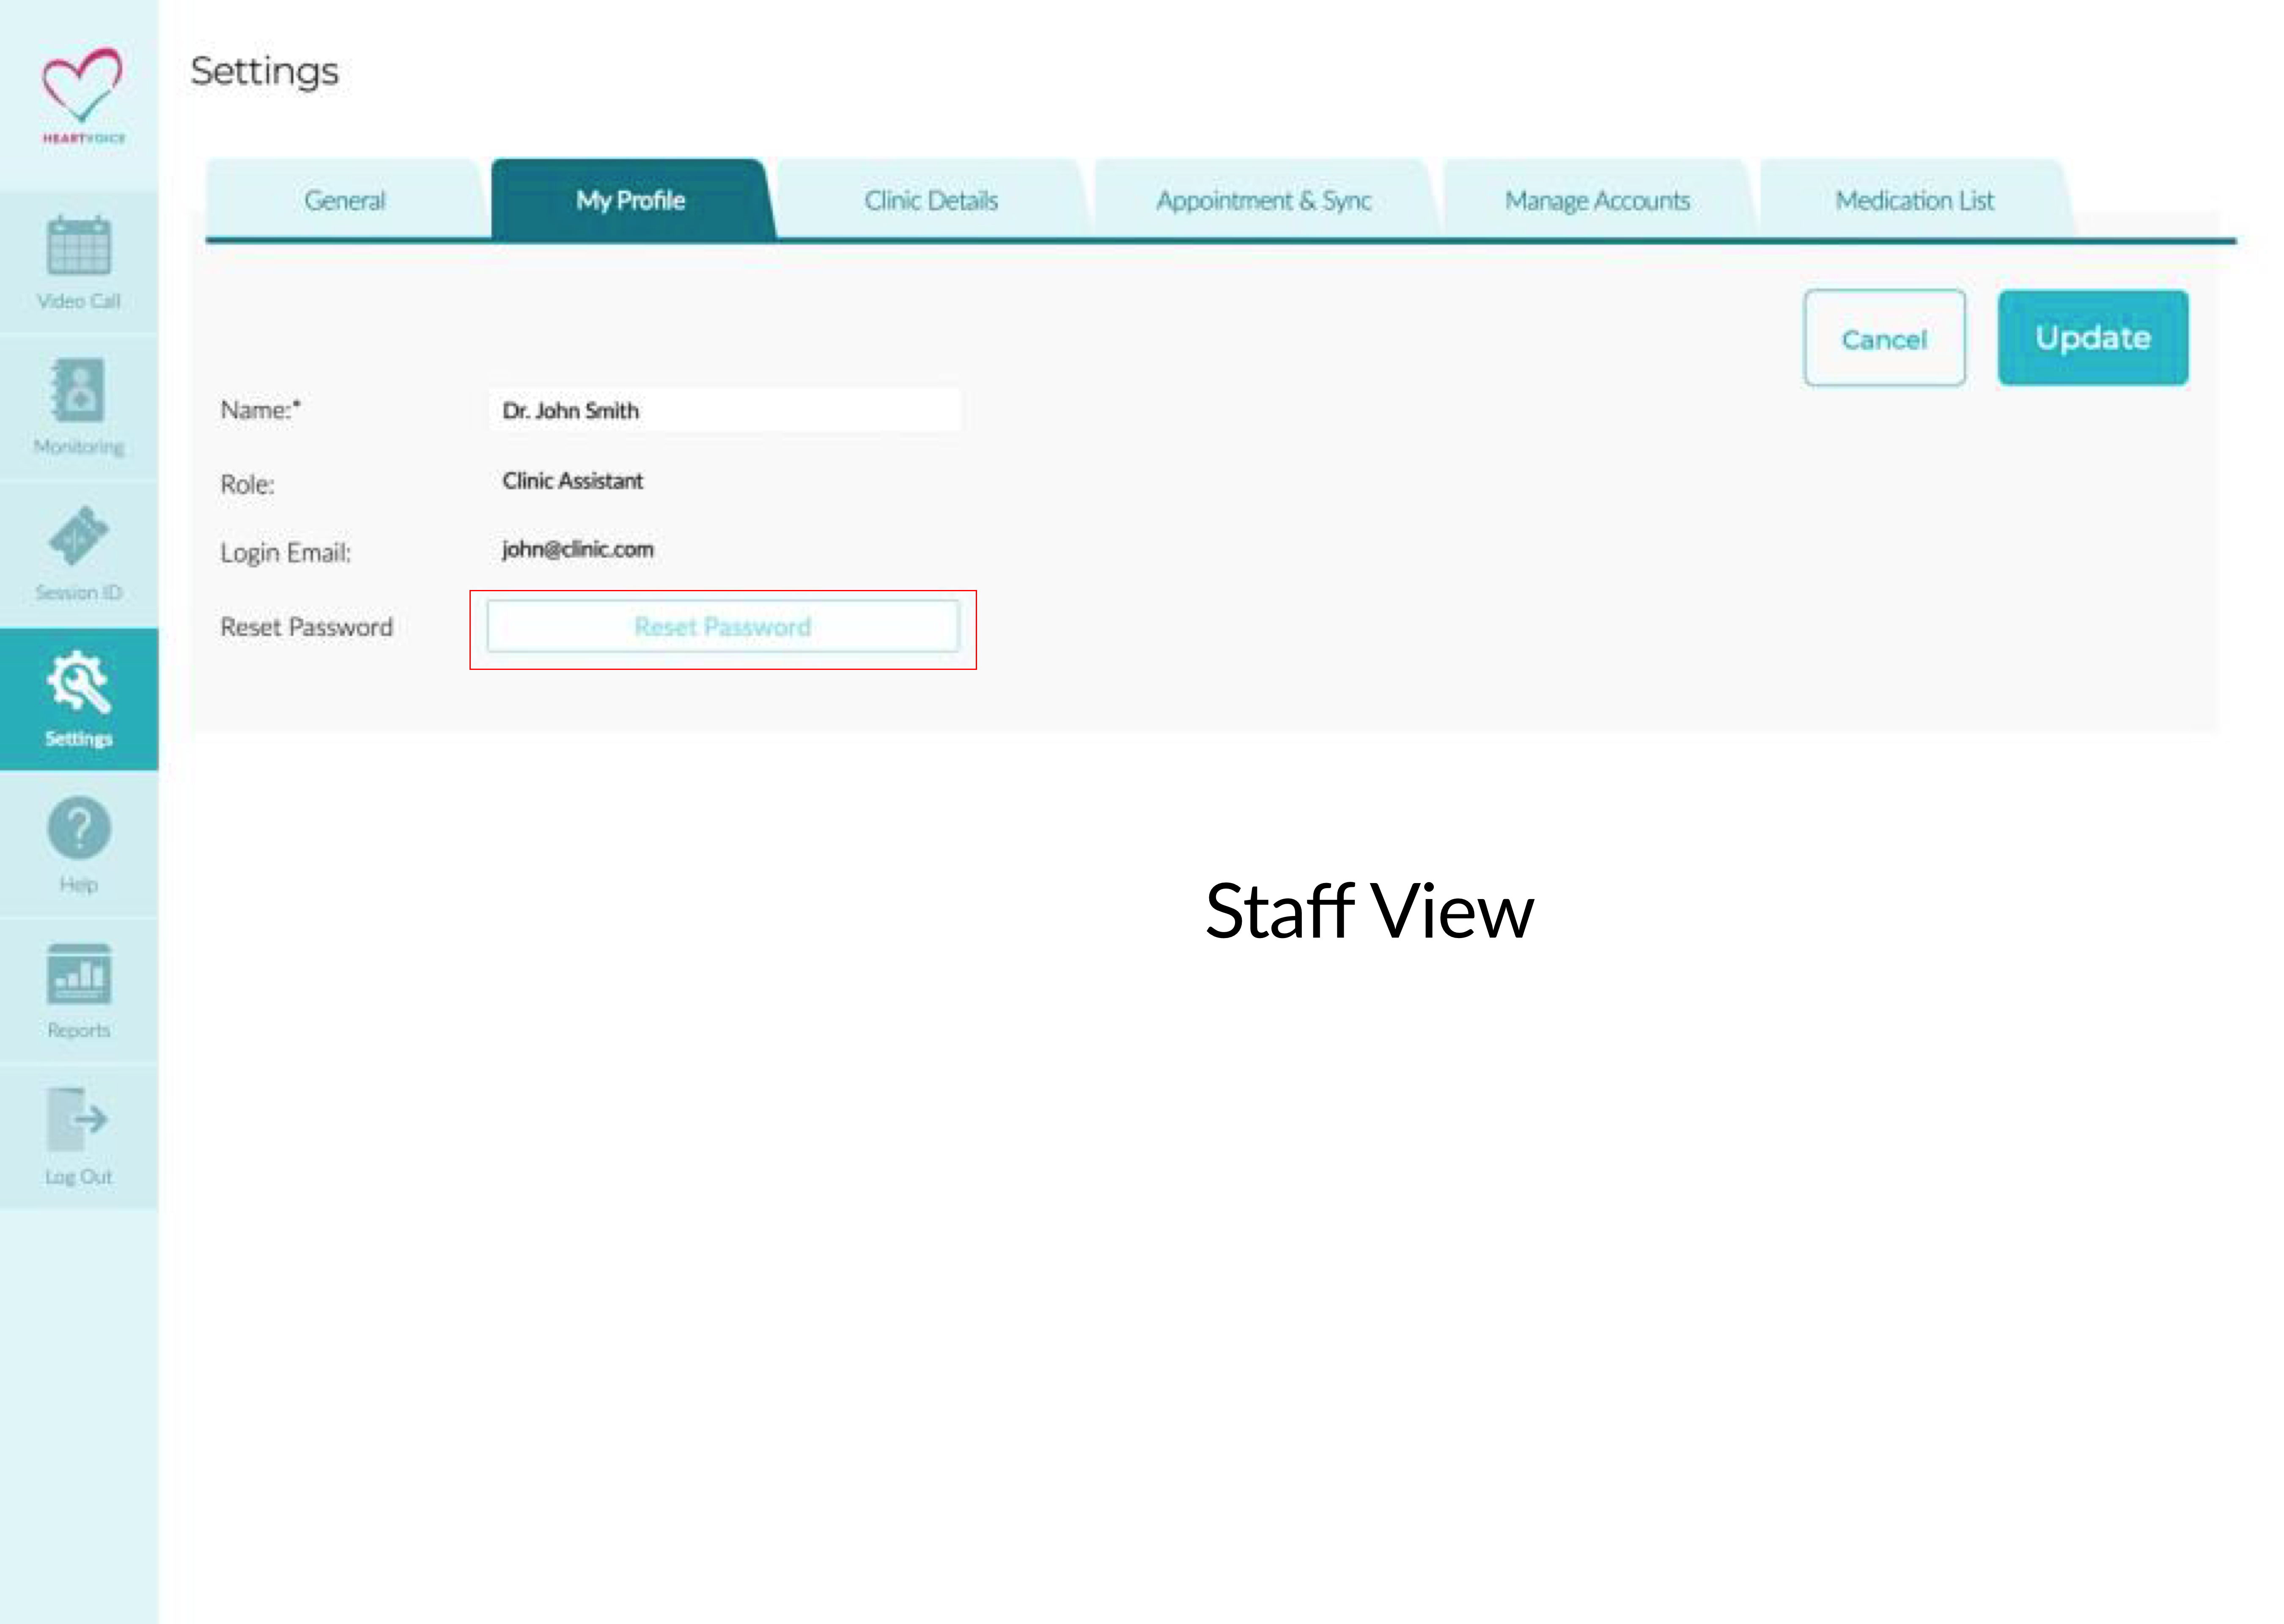
Fig 24.0 Staff’s view – reset password
Fig 24.1 Provider’s view – reset password
Q) 6.8 What is the lab reports tab?
This is in preparation for an upcoming feature! The option to receive and assign lab reports is currently not available yet, we will notify you when it is ready!